Introduction
Oracle E-Business Suite offers two printing solutions to handle all your printing requirements. For most printing needs, the Pasta Utility offers quick setup and easy maintenance. For additional flexibility, Oracle E-Business Suite allows you to define your own printer drivers and print styles.When you run an Oracle E-Business Suite report, Oracle Reports generates and formats the output. A completed report is sent to the operating system by the concurrent manager, which issues an operating system print command, or calls a custom print program or subroutine that issues an operating system print command.
Oracle Reports and Report Generation
Oracle Reports includes page break, carriage return, line feed, text bold on/off, and text underline on/off instructions within the output file. The values are retrieved from a SQL*ReportWriter (SRW) driver file.
When the report is generated for online viewing, Oracle Reports uses the SRW driver named by the print style in the Print Styles form.
When the report is to be printed, Oracle Reports uses the SRW driver named by the Oracle E-Business Suite printer driver in the Printer Drivers form.
The dimensions of a report are determined by the columns and rows values in the print style, defined using the Print Styles form. These values override the width and height values in an SRW driver file.
Concurrent Manager Issues or Calls a Print Command
When a report program finishes running, the concurrent manager depends an initialization string, and appends a printer reset string to the output file. Both strings are defined using the Printer Drivers form.
An Oracle E-Business Suite printer driver is invoked by issuing a print command or by calling a print program or subroutine.
When the printer driver method is Command, the concurrent manager can issue an operating system print command and arguments, entered in the Arguments field of the Printer Drivers form.
When the printer driver method is Program, the concurrent manager can call a custom print program, named (along with its path) in the Name field of the Printer Drivers form. Arguments to the program may be entered in the form's Arguments field.
When the printer driver method is Subroutine, the concurrent manager calls a predefined Oracle E-Business Suite subroutine that passes a print command and arguments to the printer via the operating system. The subroutine name is entered in the Program Name field of the Printer Drivers form.
The concurrent manager may provide values for four arguments to an operating system print command or custom print program:
- the name of the file to be printed
- the operating system name of the target printer
- the title of the file, which appears on a header page if it is printed
- the number of copies to be printed
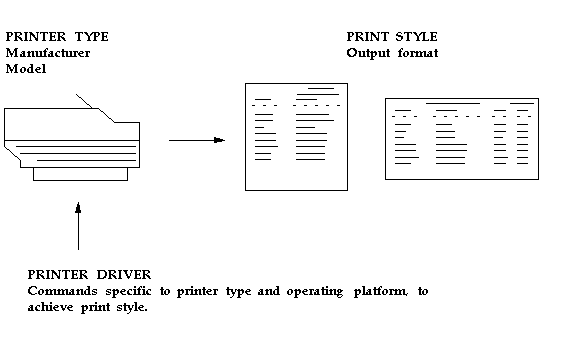
Printer Types, Print Styles, and Printer Drivers
The commands that a printer can understand vary from one type of printer to another. A printer type identifies a printer by manufacturer and model.
A print style tells the printer how a printed output should look. A printer driver delivers commands that tell the printer how to output the specified print style.
The ability to print a report in a particular print style depends on the type of printer the report file is sent to.
For each print style that a particular type of printer can print, a printer driver specific to the printer type and the operating system is required.
Printer Types
The printer type is the printer manufacturer and model. Two examples are a DEC LN03 printer and an HP Laserjet III printer.
Print Styles
A Print style defines the page format for a printer, such as the number of lines per page, the width of each line, and whether a header page should be printed.
Each printer type can have one or more associated print styles.
Print styles allow you to set up report dimensions on a variety of printers. You can tailor your page setups while providing consistent-looking reports from printer to printer.
For example, users may wish to print a menu report with a wider left margin to allow for hole punching the paper. As System Administrator, you register this new style, which users can then access if the printer type supports it.
At report submission time, users select the style in which to output the report.
- Only styles available on the destination printer are displayed.
- Some concurrent programs predefine either the printer or the print style, and these values cannot be changed.
Printer Drivers
To print in a particular style from a particular printer type, you define a printer driver. A printer driver is the mechanism that delivers a report's output along with its commands to the target printer.
Concurrent managers determine what drivers to use depending on what the print style is and what printer type the report is to be sent to.
You need to define a printer driver for each print style that you want to use with a specific printer type on a specific platform.
Sequence of Printing Events
The concurrent manager associates a print style and a printer driver with the destination printer's printer type. This combination of print style and printer driver is defined in the Printer Types form.
A printer driver tells the destination printer how to interpret the format. An SRW Driver formats text and sets page breaks within an Oracle Reports file.
Sequence of Printing Events - Example
The following is an example of the sequence of printing events.
- A user submits a request to run a report from the Run Reports form.
- A request to run the report is added to the requests table.
- A concurrent manager reads the request.
- The concurrent manager calls Oracle Reports to run the report, and passes the SRW Driver name. If Report Copies = 0 and the Printer field is blank, the Print Style's SRW Driver is used. If Report Copies > 0 and Printer is required, then the Printer Driver's SRW Driver is used.
Note: For concurrent requests running Oracle Report concurrent programs, a printer needs to be identified or associated even when the number of copies is set to 0.
The concurrent manager passes Print Style information (Columns and Rows) to Oracle Reports (overrides SRW Driver width and height if the report is to be printed). - A report is created using Oracle Reports. The concurrent manager attaches Printer Driver information to the file. It prepends the initialization string and appends the reset string.
The concurrent manager also passes suppress header option information from the Printer Styles form. - The concurrent manager issues an operating system print command with the arguments Destination Printer, Filename (including path), Number of Copies to print, and Filename for the Title on the banner page.
Setup printer in Oracle Applications R12.2.4 Step by Step
Prerequisites:
Printers should be first defined at Linux OS level by User.
Please check the status of printer at Linux level by using the following command.
[root@chintels ~]# lpstat -a
lpstat: No destinations added.
Configure Printer in Oracle Applications
The following is the order of Printer setup in Oracle Applications:
Define Driver
Define Style
Define Printer Type
Register the Printer
Login to application using System Administrator responsibility.
1. Define the printer driver:-
System Administrator> Install > Printer > Driver
provide the below values (depending upon your configuration) to set up.
Enter the Driver Name : ********
Enter the User Driver Name:*******
Description: Give some desc appropriate
SRW Driver: HP


SRW drivers are read by Oracle reports when a report is run and insert control characters which tell the destination printer on where to insert the page breaks and font to be used etc.. SRW driver is used when output file is sent to the printer
SRW driver files on Linux are located in $FND_TOP/reports.
In the above example, file name would be HPW.prt
[appl@sujeet appl]$ cd $FND_TOP/reports
[appl@sujeet reports]$ pwd
/u02/apps/apps/apps_st/appl/fnd/12.0.0/reports
[appl@sujeet reports]$ ls
APFMLB.prt ESDDBT.prt HPW.prt P60HPA.prt ps2page.prt PSTLL.prt
APLASP.prt ESEFT.prt INVBOL.prt paygb45c.prt psinit.prt PSTPL.prt
APPD.prt FCTMPLT.prt JEFT.prt paygb45l.prt psl132.prt PSTWL240.prt
A.prt FIEFT.prt JLARZFFR.prt paygbp45.prt psl180.prt PSTWL.prt
APUMLB.prt HKP.prt JLBRRBOF.prt paygbp60.prt psl240.prt PTCHECK.prt
BEEFT.prt HPA.prt JLBRRBOR.prt paygbsoe.prt psland.prt US
CHEFT.prt HPL.prt L.prt PD.prt psp132.prt W2REG.prt
DEFT.prt HPPD.prt LW2.prt PERHDCNT.prt psport.prt W.prt
ECS440.prt HPP.prt LW3.prt P.prt PSTDL.prt
[appl@sujeet reports]$
Platform: Not required
Arguments: Printer Driver pass the following arguments to program
Name of the destination printer
Number of Copies to print
Banner of the title page
Filename
Initialization and Reset strings: Instructs printer on printing characteristics are needed for the document to be printed. Printer vendor provides these details
2) Define the printer style.
System Administrator>Install > Printer > Style
Login to application using System Administrator or Application Administrator resp
Please provide the below values (depending upon your configuration) to set up.
Style Name : HP
Seq: Enter unique sequence number
User Style:*********
SRW Driver: HP , this should match with driver define page
Layout:Columns,Rows and Orinetation: Columns and Rows inserted here override the height and width defined in SRW driver file

3) Define the printer type.
System Administrator> Install > Printer > Type
Login to application using System Administrator responsibility.
Please provide the below values (depending upon your configuration) to set up.
Type: ******
Style: Style name
Driver Name: Driver name

4) Register a new printer.
Navigation Path is System Administrator>Install > Printer > Register
Login to application using System Administrator responsibility.

Please provide the below values (depending upon your configuration) to set up.
Printer : Printer Name
Type: Type defined earlier
Description : Useful description
Some important tables related with printing are:
-----------------------------------------------
FND_PRINTER
FND_PRINTER_INFORMATION
FND_PRINTER_STYLES
FND_PRINTER_DRIVERS
NOTE: Please note any changes to Printer Type, Style and Driver needs bouncing of concurrent manager for the changes to take effect.
****************************************END*************************************


