we will be performing two node installation this time with following components installed on each node.
Node 1
Includes Oracle Identity and Access Management and database
Node 2
Includes Fusion Applications domains
We are using following configuration for our 2 nodes installation.
Server:
Oracle Identity and Access Management & Database on Linux x86-64 VM (8GB RAM)
Oracle Fusion Applications 11.1.6 on Physical server – HP ML350 with 64 GB RAM
OS:
Oracle Linux 5.9 64 bit
Memory: 64GB RAM (More the memory, smoother the installation)
Swap disk: 100 GB
Local available Disk space: 300 GB on both servers (VM and Physical)
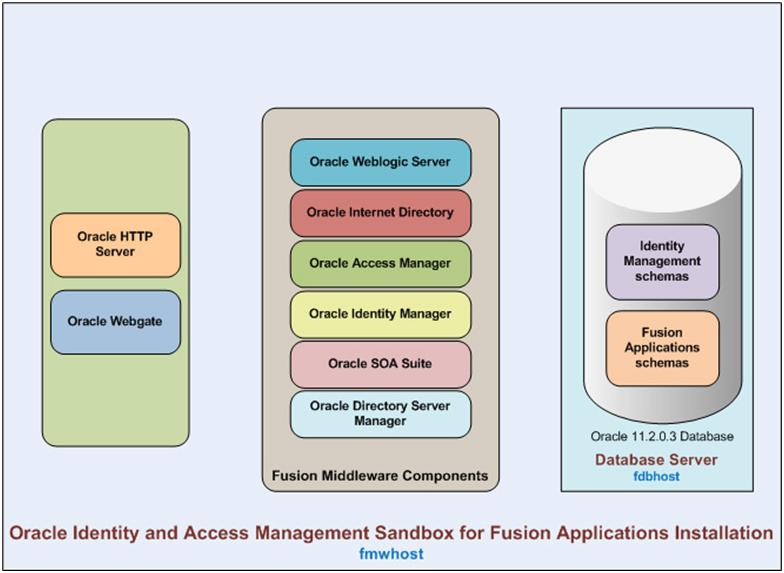
Architecture for Fusion Applications.
Now if you install Oracle Identity and
Access Management components as well as databases on one node (for
practice purpose only, not recommended to keep DB on same node for
production), or you use our VM then each of these 2 nodes will contain
following components.
Node:-1
which includes Oracle Identity
and Access Management and database will have these components. You might
notice another hostname fdbhost here. Though this is pointing to same
IP in the hosts file, but since database is configured with separate
hostname, we can any time move it to another machine without making
major changes.
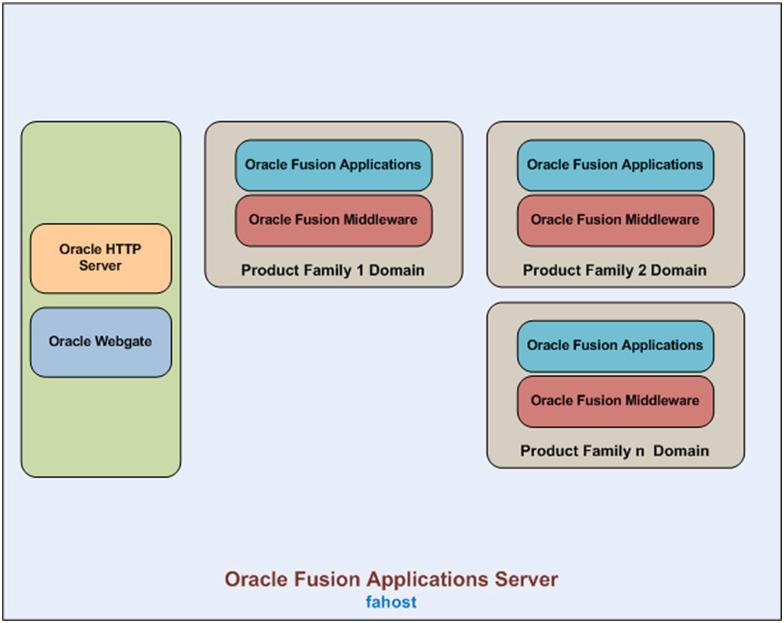
Node:-2
where you provision Fusion Applications will contain following components.
With this the architecture of complete
Fusion Applications will look as follows where each component is
highlighted with the color code for that particular node.
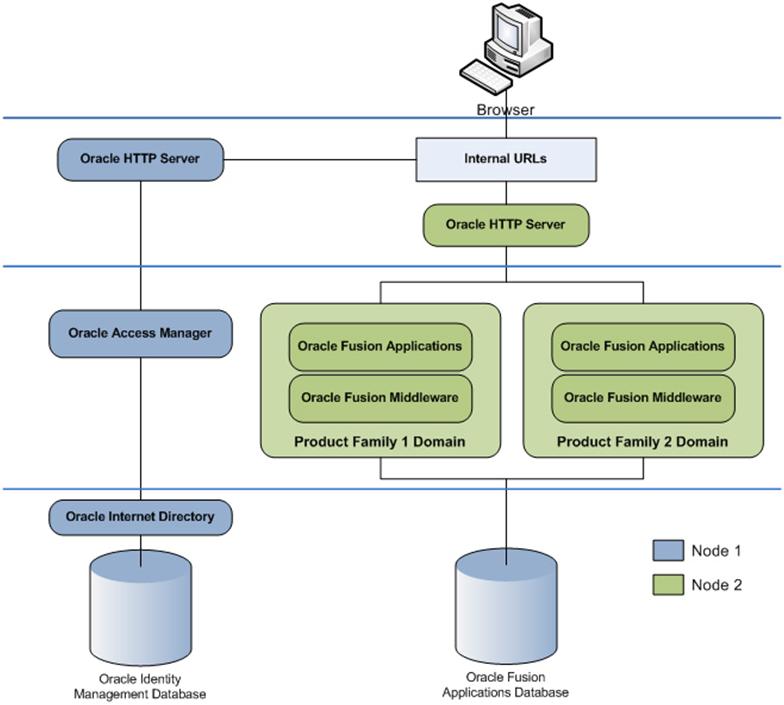
You must make sure that both the nodes
are accessible to user as well as to each other. Following diagram shows
that they must be in same network or in accessible network. You need to
make sure to have DNS or local /etc/hosts entry for IDM/DB host in the
Fusion Application node and vice versa so that they can reach each
other.
Also if you are planning to keep any
firewall between these 2 servers and if they are in different
subnet/VLANs then make sure that all required DB and middleware ports
are allowed in the firewall.
Preparing for Oracle Fusion Applications installation
- Downloading Oracle Fusion Applications media
- Creating Oracle VirtualBox Virtual Machine with Oracle Linux
OR
Install Oracle Linux or Solaris on a Physical machine (We are using physical machine with
Oracle Linux this time).
3. Staging/Creating Oracle Fusion Applications provisioning repository
Installing Oracle Fusion Applications – steps
- Install Fusion Applications Provisioning Framework
- Install Oracle 11g Database (Applications Transactional Database)
- Run Oracle Fusion Applications Repository Creation Utility (Applications RCU)
- Create another database for Oracle Identity Management Infrastructure (optional)
- Run Repository Creation Utility (RCU) for Oracle Identity Management components
- Install Oracle Identity and Access Management Components
- Apply mandatory Patches
- Configure Oracle Identity and Access Management components
- Integrate Oracle Identity Manager (OIM) and Oracle Access Manager (OAM)
- Install provisioning framework on Node 2
- Create new Response File
- Provision an Applications Environment
We are going to install
Fusion Applications 11.1.6 for
Oracle Linux x86-64 Operating system. So we will download the installation media for Oracle Fusion Applications 11.1.6 for Linux x86-64 from
http://edelivery.oracle.com
Login to access the following screen.

Select “
Oracle Fusion Applications” and required platform from the list. Click
Go. Open the first pack.

Download the first
17 media files (excluding README and
documentation library). We will not need rest of the media for this
installation. Unzip all these files into one Stage directory.
Important Note:
Since some of the files have very long directory path (very close to 255 characters), please unzip these files into
stage folder name to keep short name. At least 2 files have very long path so let us try to avoid this.
We must have OS installed either on physical or a virtual machine in order to proceed with the installation.
Note:
We can also use VMWare to host the Virtual Machine. We
will post another guide on setting up VMWare virtual machine. But the
good thing is that the virtual machine/disks which we create in
VirtualBox, same we can use in VMWare as well since we will create
.vmdk format disks. This will add flexibility for you to use it anywhere later.
- Install Fusion Applications Provisioning Framework
Prerequisites (Linux only)
Make sure that the host name is correctly set. I our case it is fmwhost.paramlabs.com
[root@rfmwhost~]# hostname
fmwhost.paramlabs.com
If not correct, set it using following command.
[root@ rfmwhost ~]# hostname fmwhost.paramlabs.com
[root@fmwhost ~]# more /etc/sysconfig/network
NETWORKING=yes
NETWORKING_IPV6=yes
HOSTNAME=fmwhost.paramlabs.com
If not correct, modify the value here to correct hostname.
If you changed hostname or IP address, please make sure to update in all following files if not automatically updated.
[root@fmwhost ~]# more /etc/sysconfig/network-scripts/ifcfg-eth0
[root@fmwhost ~]# more /etc/sysconfig/networking/devices/ifcfg-eth0
[root@fmwhost ~]# more /etc/sysconfig/networking/profiles/default/ifcfg-eth0
Restart the machine if you changed the hostname or IP to make sure it remains persistent.
Make sure to have following entries in hosts file.
[root@fmwhost ~]# more /etc/hosts
# Do not remove the following line, or various programs
# that require network functionality will fail.
127.0.0.1 localhost.localdomain localhost
#::1 localhost6.localdomain6 localhost6
192.168.112.111 fmwhost.paramlabs.com fmwhost
192.168.112.111 fdbhost.paramlabs.com fdbhost
Important Note: If you
noticed, we have made 2 entries here for same IP. The reason being, in
case if you want to keep DB on different server or move it to different
server later, we can easily do it since our all configuration will use
different DB host name.
If you are not using DNS resolution then
comment out following entries in /etc/resolve.conf to speed up name
resolution directly through hosts file.
[root@r12host ~]# more /etc/resolv.conf
#search paramlabs.com
If you have not already created the user fusion, please create as follows.
[root@fmwhost ~]# useradd -g dba -G oinstall fusion
[root@fmwhost ~]# passwd fusion
Changing password for user fusion.
New UNIX password:
Retype new UNIX password:
passwd: all authentication tokens updated successfully.
Change the system file /etc/security/limits.conf as follows.
[root@fmwhost ~]# cp -pr /etc/security/limits.conf /etc/security/limits.conf.bak
[root@fmwhost ~]# vi /etc/security/limits.conf
Edit the values as follows.
[root@fmwhost ~]# tail -3 /etc/security/limits.conf
# Fusion Applications specific changes
fusion soft nofile 327679
fusion hard nofile 327679
Also make sure UsePAM is set to Yes in /etc/ssh/sshd_config file
[root@fmwhost ~]# vi /etc/ssh/sshd_config
Edit /proc/sys/fs/file-max and set it to 6553600. No need for any changes if set to this or more.
The change becomes effective immediately but does not persist after a reboot. To make the change
permanent edit /etc/sysctl.conf and set fs.file-max = 6553600
[root@fmwhost ~]# ulimit -u
24064
This should be 16384 or more
Make sure tmpfs size is more than the
size you want to keep for the database SGA and PGA. In our case we are
going to reduce DB memory to only 2GB since this is demo installation on
VM, hence changing tmpfs to 3GB or more
[root@fmwhost ~]# cp -pr /etc/fstab /etc/fstab.bak
[root@fmwhost ~]# vi /etc/fstab
Change values as follows (only if it is less this 3G)
[root@fmwhost ~]# grep tmpfs /etc/fstab
tmpfs /dev/shm tmpfs size=3G 0 0
Restart machine
Note: If this size is less than memory_target then you will get error
ORA-00845: MEMORY_TARGET not supported on this system
Make sure that ip_local_port_range value is 32768 to 61000
First checking existing value.
[root@fmwhost ~]# cat /proc/sys/net/ipv4/ip_local_port_range
9000 65500
Now let’s change as per the requirement.
[root@fmwhost ~]# echo “32768 61000″ > /proc/sys/net/ipv4/ip_local_port_range
[root@fmwhost ~]# cat /proc/sys/net/ipv4/ip_local_port_range
32768 61000
To make this change persistent across reboots, change value in /etc/sysctl.conf
[root@fmwhost ~]# cp -p /etc/sysctl.conf /etc/sysctl.conf.bak
[root@fmwhost ~]# vi /etc/sysctl.conf
Edit the values as follows.
[root@fmwhost ~]# grep 61000 /etc/sysctl.conf
net.ipv4.ip_local_port_range = 32768 61000
Before you install the Oracle Database
using the Provisioning Wizard, ensure that the value of the kernel
parameter shmmax on the database host is greater than the value of the
System Global Area (SGA) Memory.
The value of SGA Memory (sga_target) is 9
GB in the default Database Configuration Assistant (DBCA) template for
the Starter database. If you are running DBCA using the production DBCA
template packaged with Oracle Fusion Applications Provisioning, the
value of the SGA Memory is 18 GB. Ensure that shmmax > (shmall *
shmmni) > SGA Memory, where shmmax, shmall, shmmni are kernel
parameters.
For example, to retrieve the values of these kernel parameters on Linux, use the following command:
[root@fmwhost ~]# /sbin/sysctl -a | grep shm
kernel.shmmax = 4398046511104
kernel.shmall = 1073741824
kernel.shmmni = 4096
vm.hugetlb_shm_group = 0
To set the value of a kernel parameter:
user@host> /sbin/sysctl -w sys.kernel.shmmax=value
If you are using VMWare or virtualbox, you can share the installation stage folder to the VM using shared folders option.
[fusion@fmwhost ~]$ cd /mnt/hgfs/setup/installers/faprov/Disk1/
[fusion@fmwhost Disk1]$ ./runInstaller
(make sure NOT TO use “&” since this will prompt for java directory if java home is not set)
Starting Oracle Universal Installer…
…
Please specify JRE/JDK location ( Ex. /home/jre ), <location>/bin/java should exist :/mnt/hgfs/setup/jdk6
…
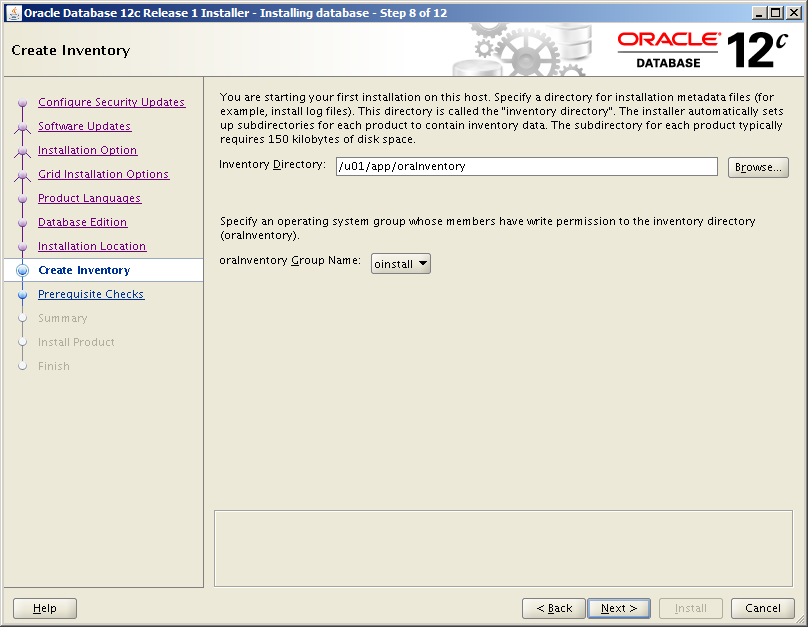
If this is the first Oracle software on this machine using this user, it will prompt for inventory directory location.
Once prompted, run the following script as root.
[root@fmwhost ~]# /home/fusion/oraInventory/createCentralInventory.sh
Setting the inventory to /home/fusion/oraInventory
Setting the group name to dba
Creating the Oracle inventory pointer file (/etc/oraInst.loc)
Changing permissions of /home/fusion/oraInventory to 770.
Changing groupname of /home/fusion/oraInventory to dba.
The execution of the script is complete.
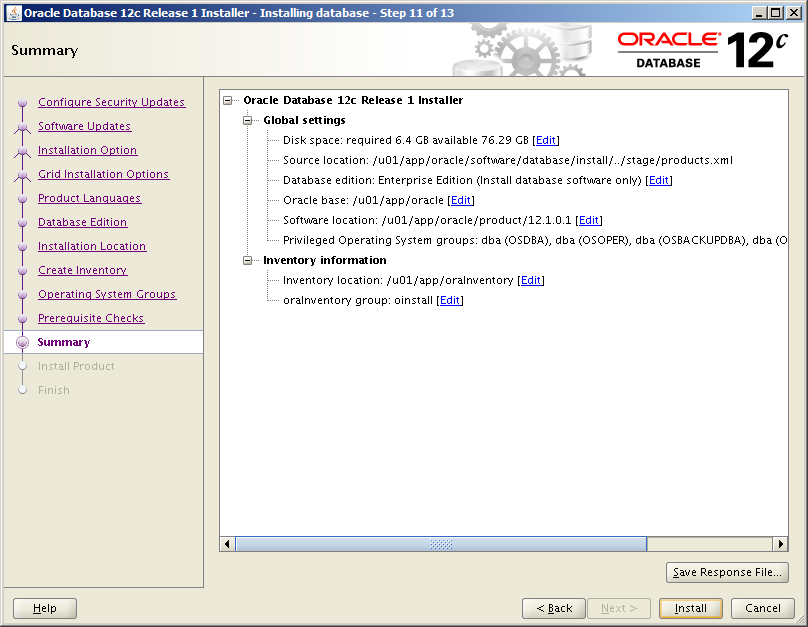
Click Next
Once prerequisite check is completed, click Next
Create the root directory for installation as follows.
[root@fmwhost ~]# mkdir /app
[root@fmwhost ~]# chown fusion:dba /app
Enter /app/fusion and click Next
Review summary and click Install
Save inventory if required.
Once installation is finished click Next
Review the summary and click Finish.
Fusion Applications 11.1.6 ships with Oracle 11g (11.2.0.3.0)
database. You can either install it separately (if you want to install
RAC database) or use Fusion provisioning Wizard to create one.
To install Applications Transactional Database we need to run Oracle
Fusion Applications Provisioning Wizard from
<framework_location>/provisioning/bin
<framework_location> is same where we installed the framework in previous post. i.e. /app/fusion
[fusion@fmwhost Disk1]$
cd /app/fusion/provisioning/bin/
We need to temporarily set JAVA_HOME to jdk6 directory shipped with the installation media
[fusion@fmwhost bin]$
export JAVA_HOME=/mnt/hgfs/setup/jdk6
[fusion@fmwhost bin]$
./provisioningWizard.sh – ignoreSysPrereqs true &
Please use “
ignoreSysPrereqs true” flag since you might need to skip some memory prerequisite warnings if required.
 Click Next
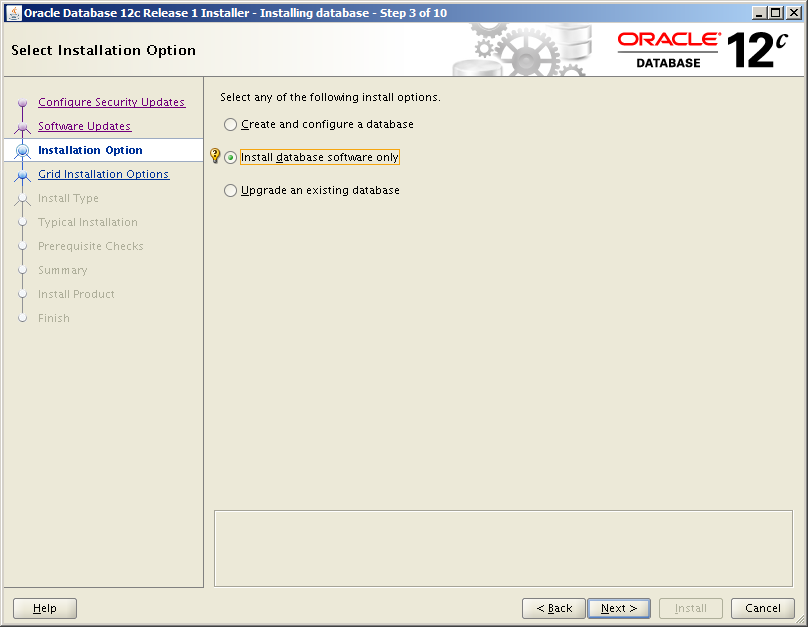
 Select “Install an Applications Transactional Database” option. Click Next
 Deselect the checkbox if you wish and click Next
 Click Yes

Enter values as mentioned here and click Next.
Port: 1521 (we have kept it default, you can change it)
Installers directory location: /mnt/hgfs/stage (directory where we created the stage)
Oracle Base: /app/fusion/database
Software Location: Will be populated automatically
OSDBA group: dba
Global Database Name: fusiondb (you can keep any name you want)
Password: Oracle123 (We
have used Oracle123 for any passwords during the installation since it
satisfies all requirements during this installation. You can keep any
complex password you want)
 Once prerequisites check is successful, click Next.
 Save summary if required

Save summary if required.

Once Installation completes (20% progress), it will prompt as follows.

Open another window and run the following script.
root@fmwhost # /app/fusion/database/product/11.2.0/dbhome_1/root.sh
Check
/app/fusion/database/product/11.2.0/dbhome_1/install/root_fmwhost.paramlabs.com_2013-02-28_17-06-18.log
for the output of root script
[root@fmwhost ~]#
tail -f /app/fusion/database/product/11.2.0/dbhome_1/install/root_fmwhost.paramlabs.com_2013-02-28_17-06-18.log
The following environment variables are set as:
ORACLE_OWNER= fusion
ORACLE_HOME= /app/fusion/database/product/11.2.0/dbhome_1
Creating /etc/oratab file…
Entries will be added to the /etc/oratab file as needed by
Database Configuration Assistant when a database is created
Finished running generic part of root script.
Now product-specific root actions will be performed.
Finished product-specific root actions.
Click OK

Once installation till validation is complete, click Next. If you get minimum memory related warning, you can ignore here, provided you have used “ignoreSysPrereqs true” flag

Click Close to complete the installation.
Reduce memory size of database
We will reduce the size of SGA and PGA to avoid getting out of memory in server since fusion requires too much memory.
Important Note: We
are reducing the SGA and PGA (from 10GB to 2GB). We are doing this
since we are running on lesser RAM than required. This is not
recommended for production installation but since this is only a
demo/development installation, you can safely do this. If you wish to
keep it 10GB you can do it but this will increase the swap usage
exponentially.
Since
we are reducing the size of SGA and PGA, next step (RCU) may fail in
pre-requisite check. So we will need to change the pre-req check xml
file to look for lower value. We will explain this in next post.
[fusion@fmwhost bin]$ export ORACLE_HOME=/app/fusion/database/product/11.2.0/dbhome_1
[fusion@fmwhost bin]$ export ORACLE_SID=fusiondb
[fusion@fmwhost bin]$ export PATH=$PATH:$PATH:$ORACLE_HOME/bin
[fusion@fmwhost bin]$ sqlplus / as sysdba
SQL> create pfile from spfile;
File created.
SQL> shut immediate;
[fusion@fmwhost bin]$ more /app/fusion/database/product/11.2.0/dbhome_1/dbs/initfusiondb.ora
#fusiondb.__db_cache_size=7516192768
#fusiondb.__java_pool_size=33554432
#fusiondb.__large_pool_size=33554432
fusiondb.__oracle_base=’/app/fusion/database’#ORACLE_BASE set from environment
#fusiondb.__pga_aggregate_target=4294967296
#fusiondb.__sga_target=9663676416
#fusiondb.__shared_io_pool_size=536870912
#fusiondb.__shared_pool_size=1442840576
#fusiondb.__streams_pool_size=33554432
#*.pga_aggregate_target=4294967296
#*.sga_target=9663676416
*.memory_target=2147483648
-bash-3.2$ sqlplus / as sysdba
Connected to an idle instance.
SQL> create spfile from pfile;
File created.
SQL> startup
ORACLE instance started.
Total System Global Area 2138521600 bytes
Fixed Size 2161024 bytes
Variable Size 1795163776 bytes
Database Buffers 335544320 bytes
Redo Buffers 5652480 bytes
Database mounted.
Database opened.
Run Oracle Fusion Applications Repository Creation Utility (Applications RCU)
Please note that RCU are available only
for Windows and Linux platforms. Hence we may need to run the RCU on
Windows or Linux machine which can connect to this database.
Fusion Applications stage already has
both Applications and Fusion Middleware RCUs for Linux but for Windows
only apps RCU is included in the installer.
For Windows Fusion Middleware RCU, you need to download
V29675-01.zip or
ofm_rcu_win_11.1.1.6.0_disk1_1of1.zip from
Oracle website or support website.
Since this installation is on Linux and
in our last post for 11.1.5 we had shown steps for Windows, we will go
with Linux version here.
For Linux, the RCU is included in repository_location/installers/apps_rcu location.
Create a directory on physical partition and call it APPS_RCU_HOME
[fusion@fmwhost dbs]$ mkdir /app/fusion/provisioning/apps_rcu
Go to repository_location/installers/apps_rcu
and locate the rcuHome_fusionapps_linux.zip file. This file was staged
when you created the installer repository.
Extract the contents of
rcuHome_fusionapps_linux.zip to a directory (APPS_RCU_HOME) on the
database server. All dependent components that Applications RCU needs
are included in this zipped file.
[fusion@fmwhost dbs]$ cd /app/fusion/provisioning/apps_rcu
[fusion@fmwhost apps_rcu]$ unzip /mnt/hgfs/setup/installers/apps_rcu/linux/rcuHome_fusionapps_linux.zip
Create a temporary directory on the database server. Make a note of the location.
You will need to enter this location when you specify a value for FUSIONAPPS_DBINSTALL_DP_DIR
[fusion@fmwhost apps_rcu]$ mkdir /app/fusion/provisioning/apps_rcu/dp_dir
Locate and copy
APPS_RCU_HOME/rcu/integration/fusionapps/export_fusionapps_dbinstall.zip
to the directory you specified for FUSIONAPPS_DBINSTALL_DP_DIR.
Unzip export_fusionapps_dbinstall.zip to FUSIONAPPS_DBINSTALL_DP_DIR.
[fusion@fmwhost apps_rcu]$
cd /app/fusion/provisioning/apps_rcu/dp_dir
[fusion@fmwhost dp_dir]$
unzip /app/fusion/provisioning/apps_rcu/rcu/integration/fusionapps/export_fusionapps_dbinstall.zip
Go to APPS_RCU_HOME/rcu/integration/biapps/schema and locate the otbi.dmp file.
Copy otbi.dmp to FUSIONAPPS_DBINSTALL_DP_DIR (where you unzipped the contents of export_fusionapps_dbinstall.zip)
[fusion@fmwhost dp_dir]$
cp -p ../rcu/integration/biapps/schema/otbi.dmp /app/fusion/provisioning/apps_rcu/dp_dir/
Launch Repository Creation Utility (RCU)
[fusion@fmwhost dp_dir]$ cd /app/fusion/provisioning/apps_rcu/bin
[fusion@fmwhost bin]$ ./rcu
Click Next
Click Next
Enter the values as mentioned here and click Next. Change host name to fdbhost if you have kept different hostname for database host. In our case we will change from fmwhost to fdbhost (the screenshot is before changing the value)
Once the prerequisites check is finished, click OK
Select all components and click Next
Important Note: If you had reduced SGA and PGA size after DB installation then this prerequisites check may fail with following error.
RCU-6083:Failed –
Check prerequisites requirement for selected component:FUSIONAPPS Please
refer to RCU log at
apps_rcu/rcuHome/rcu/log/logdir.2013-02-28_23-28/rcu.log for details.
RCU-6107:DB Init Param Prerequisite failure for: pga_aggregate_target
Current Value is 0. It should be greater than or equal to 4294967296.
RCU-6107:DB Init Param Prerequisite failure for: sga_target Current
Value is 0. It should be greater than or equal to 9663676416.
RCU-6092:Component Selection validation failed. Please refer to log at
apps_rcu/rcuHome/rcu/log/2013-02-28_23-28/rcu.log for details.
To fix this issue, we need to modify the minimum requirement of SGA and PGA in installer pre-requisite config file located at apps_rcu /rcu/integration/fusionapps/fusionapps.xml
[fusion@fmwhost ~]$
cp -p
/app/fusion/provisioning/apps_rcu/rcu/integration/fusionapps/fusionapps.xml
/app/fusion/provisioning/apps_rcu/rcu/integration/fusionapps/fusionapps.xml.bak
RCU-6083:Failed – Check prerequisites requirement for selected component:FUSIONAPPS
RCU-6107:DB Init Param Prerequisite failure for: pga_aggregate_target
Current Value is 2147483648. It should be greater than or equal to 4294967296.
RCU-6107:DB Init Param Prerequisite failure for: sga_target
Current Value is 2147483648. It should be greater than or equal to 9663676416.
To fix this issue, we need to modify the
minimum requirement of SGA and PGA in installer pre-requisite config
file located at /app/fusion/provisioning/apps_rcu/rcu/integration/fusionapps/fusionapps.xml
Change these values as follows.
<DBPrerequisite COMPARE_OPERATOR=”GE” DATA_TYPE=”NUMBER” PREREQ_TYPE=”InitParameter”>
<ValidIf DBTYPE=”ORACLE”/>
<PrereqIdentifier>sga_target</PrereqIdentifier>
<PrereqValue>0</PrereqValue>
</DBPrerequisite>
…
<DBPrerequisite COMPARE_OPERATOR=”GE” DATA_TYPE=”NUMBER” PREREQ_TYPE=”InitParameter”>
<ValidIf DBTYPE=”ORACLE”/>
<PrereqIdentifier>pga_aggregate_target</PrereqIdentifier>
<PrereqValue>0</PrereqValue>
</DBPrerequisite>
Note: You may need to click Back go to the database details window and click Next again to retry.
Once prerequisites check is successful, click OK
Enter same password (for example Oracle123) for all schemas for now. Click Next
Open another terminal window. Create following directories for custom environment variables.
[fusion@fmwhost ~]$ mkdir /app/fusion/database/applcp
[fusion@fmwhost ~]$ mkdir /app/fusion/database/appllog
[fusion@fmwhost ~]$ mkdir /app/fusion/database/obieebkp
Specify these following values in the same screen under Fusion Applications Component (expect first value which is the temporary DP directory created before /app/fusion/provisioning/apps_rcu/dp_dir)
Supervisor Password:
You must enter the same password you set up as ODI SUPERVISOR in
Applications RCU. Since we kept all passwords as Oracle123, nothing much
to remember. Enter the same password.
Work Repository Password: Default = None. You must enter the same password set up as ODI SUPERVISOR in Applications RCU.
Oracle Transactional BI : Directory on the database server where Oracle Transactional Business Intelligence import and export files are stored. Enter /app/fusion/provisioning/apps_rcu/dp_dir again.
Click Next
Click OK
Once Tablespaces creation is complete, click OK
Review the summary and click Create to import the required users and data.
Above timings are just for your reference to know how much time each may take.
You can also monitor the import logs at /app/fusion/dp_dir
Once completed, click Close
Make sure that no component failed. Also check the import log files at /app/fusion/dp_dir for any errors
SQL> select comp_name from schema_version_registry where status=’LOADING’;
It should not return any rows.
Run Repository Creation Utility (RCU) for Oracle Identity Management components
Important Note: Please
note that we are not creating a separate database here for Oracle
Identity Management components, though it is recommended but not
mandatory to have a separate database for this. But since we are doing
single node installation for Fusion Middleware and database node, we
have to manage memory properly and hence we are not creating separate
database instance.
We will create these schemas in our
Fusion Database (fusiondb) itself since the schema names are distinct
compared to Fusion Application schemas. We will save a lot of Memory for
our Virtual Machine.
In order to run RCU for Identity Management on same database, we must set the open_cursors parameter to 800.
Open a new database session and set following values.
SQL>
show parameter open_cursors
NAME TYPE VALUE
———————————— ———– ——————————
open_cursors integer 500
SQL>
alter system set open_cursors=800 scope=both sid=’*';
System altered.
SQL>
show parameter open_cursors
NAME TYPE VALUE
———————————— ———– ——————————
open_cursors integer 800
As we mentioned in the previous post,
RCU for Oracle Identity Management components is only available for
Linux and Windows platforms and the Fusion Application setup ships with
Linux only RCU for Identity Management components.
If you want to run from Widnows (if your
FA installation is on Windows, Solaris, HP-UX or AIX) then the RCU file
can be downloaded from oracle website. The name on edelivery is V29675-01.zip while the name on technetwork download site is ofm_rcu_win_11.1.1.6.0_disk1_1of1.zip or any newer file (if available) which includes Repository Creation Utility for 11.1.1.6.0 Fusion Middleware Components.
[fusion@fmwhost fmw_rcu]$
mkdir /app/fusion/provisioning/fmw_rcu
[fusion@fmwhost fmw_rcu]$
cd /app/fusion/provisioning/fmw_rcu
[fusion@fmwhost fmw_rcu]$
unzip /mnt/hgfs/setup/installers/fmw_rcu/linux/rcuHome.zip
Launch Repository Creation Utility for Oracle Identity Management from<Framework_location>/fmw_rcu/bin location
Launch the utility using ./rcu command
[fusion@fmwhost fmw_rcu]$
cd /app/fusion/provisioning/fmw_rcu/bin
[fusion@fmwhost bin]$
./rcu &

Click
Next

Select Create and click
Next

Enter details of our existing database and click
Next

Once prerequisites check completes, click
OK

Mention any prefix for Identity Management related schemas. The default value is
DEV while we have changed it to
FA. As per fusion applications documentations, they have given example as
EDG or
ISA. You can use whichever you want but please make a note of this since at many places you will need to mention the schema name.
Select all “Identity Management” components and click
Next

 Once prerequisites check is completed, click OK

We have specified single password for all users i.e. Oracle123. Click
Next

Review the information and click
Next

Click
OK to create the tablespaces.

Once tablespaces creation is complete, click
OK

Click
Create to create users and start import.

Once import completes, above script appears. Click
Close to finish RCU.
Make sure that there are no invalid objects after the import.
SQL>
select owner, count(1) from dba_objects where status=’INVALID’ group by owner;
OWNER COUNT(1)
—————————— ———-
FA_OIM 3
FA_SOAINFRA 2
Since we can see some invalids, we can compile them.
SQL>
@?/rdbms/admin/utlrp
SQL>
select owner, count(1) from dba_objects where status=’INVALID’ group by owner;
no rows selected
Install Oracle Identity and Access Management Components
JDK installation
Installation
of JDK is very simple. Just unzip the jdk6.zip file located at
<repository_location>/installers/jdk to any location where we want
to extract the JDK files.
We will extract the files at /app/fusion and it will create /app/fusion/jdk6 directory. So we can setJAVA_HOME to /app/fusion/jdk6
[fusion@fmwhost fusion]$ cd /app/fusion/
[fusion@fmwhost fusion]$ unzip /mnt/hgfs/setup/installers/jdk/jdk6.zip
Install Web tier 11.1.1.6.0 (HTTP server 2.0)
Start runInstaller script from <REPOSITORY_LOCATION>/installers/Webiter/Disk1
(Please
note that we do not need to upgrade it as we did in earlier
installation since this is already at the required version level)
Make sure following 2 variables are not set.
[fusion@fmwhost ~]$ env | grep LD_ASSUME_KERNEL
[fusion@fmwhost ~]$ env | grep ORACLE_INSTANCE
[fusion@fmwhost fusion]$ cd /mnt/hgfs/setup/installers/webtier/Disk1/
[fusion@fmwhost Disk1]$ ./runInstaller
Click Next
“Skip Software Updates” and click Next
Select “Install Software – Do Not Configure” and click Next
Once Prerequisites check completes, click Next
Enter following values and click Next
Oracle Middleware Home: /app/fusion/fmw
Oracle Home Directory: web
Deselect the checkbox and click Next
Click Yes
Review Summary and click Install. Save response file if required.
Save response file if required.
Once installation completes, click Next
Review and click Finish
Install Weblogic Server
Make sure the java version is 1.6.x
[fusion@fmwhost patch]$ /app/fusion/jdk6/bin/java -version
java version “1.6.0_31″
Java(TM) SE Runtime Environment (build 1.6.0_31-b05)
Oracle JRockit(R) (build R28.2.3-13-149708-1.6.0_31-20120327-1523-linux-x86_64, compiled mode)
[fusion@fmwhost ~]$ export PATH=/app/fusion/jdk6/bin:$PATH
Start Weblogic Server installation from <REPOSITORY_LOCATION>/installers/weblogic direcotry
[fusion@fmwhost ~]$ cd /mnt/hgfs/setup/installers/weblogic/
[fusion@fmwhost weblogic]$ java -d64 -jar wls_generic.jar
Click Next
Provide location of Middleware Home directory “/app/fusion/fmw” and click Next
Click Yes
Deselect the checkbox and click Next
Due
to a bug in Linux/Solaris installation of Weblogic, following screen
will keep on coming despite you click Yes. (only for Linux/Solaris
installation)
Click Yes
Select the Checkbox and click Continue
Select Typical and click Next
“Oracle Weblogic Server” and “Oracle Coherence” are installed when you select Typical
Oracle JDK will be automatically selected, if not browse for the same. Click Next
Make sure the values are as above and click Next
Review the summary and click Next
This starts the weblogic installation
Deselect Quickstart and click Done
Install Oracle Identity Management 11.1.1.6.0
We need to first unzip the installation files from <repository_location>/installers/idm directory.
[fusion@fmwhost weblogic]$ cd /app/fusion/provisioning
[fusion@fmwhost provisioning]$ unzip /mnt/hgfs/setup/installers/idm/idm.zip
(Please
note that we don’t need to upgrade this as well like earlier
installations since it is already at the required version level. There
is a patchset included in the installer but that is required only if you
have existing lower version of IDM installed)
Start the installation by executing runInstaller from <provisioning_repository>/idm/Disk1
[fusion@fmwhost provisioning]$ cd /app/fusion/provisioning/idm/Disk1/
[fusion@fmwhost Disk1]$ ./runInstaller
Click Next
Select “Skip software upgrade” and click Next
Select “Install Software – Do Not Configure” and click Next
Once prerequisites check completes, click Next
Select value “/app/fusion/fmw” as Middleware home and “idm” as Home directory. Click Next
Deselect the checkbox and click Next
Click Yes
Review the Summary and click Install. Save summary if required.
Save summary if required.
Once installation completes, click Next
The above dialog box will appear. Open another window and execute following as root.
[root@fmwhost ~]# /app/fusion/fmw/idm/oracleRoot.sh
Review the summary and click Finish
Patch Oracle Identity Management
Following step can be skipped as on
publishing this article, but this is just to make sure that you are
already on correct patchset at the time you are installing this.
Important Note: There
is a patchset included in installers directory so let us try to install
this. In our case it will exit saying we already have higher version
included but make sure to run this since when you are installing it
later, your installer directory might have higher version.
[fusion@fmwhost idm_patchset]$ cd /app/fusion/provisioning/idm/
[fusion@fmwhost idm]$ unzip /mnt/hgfs/setup/installers/idm/idm_patchset.zip
[fusion@fmwhost Disk1]$ cd /app/fusion/provisioning/idm/idm_patchset/Disk1/
[fusion@fmwhost Disk1]$ ./runInstaller
Click Next
Enter values as above and click Next
This means that this patchset is not
required since we already have 11.1.1.6 installed. If at the time of
your installation, the newer installers directory includes newer
patchset then it will go ahead. Here we will cancel this at this point.
Install SOA suite 11.1.1.6.0
Start the installation by executing runInstaller from <repository_location>/installers/soa/Disk1
[fusion@fmwhost Disk1]$ cd /mnt/hgfs/setup/installers/soa/Disk1/
[fusion@fmwhost Disk1]$ ./runInstaller
Please specify JRE/JDK location ( Ex. /home/jre ), <location>/bin/java should exist :/app/fusion/jdk6
Click Next
Select “Skip software update” and click Next
Once prerequisites check completes, click Next
Select “/app/fusion/fmw” as Middleware home and “SOA” as Home Directory. Click Next
Weblogic Server will be detected. Click Next
Review the summary and click Install. Save response file if required
Once completed, click Next
Review the summary and click Finish
Install Identity and Access Management
We need to first unzip the installation files from <repository_location>/installers/oam directory.
[fusion@fmwhost provisioning]$ cd /app/fusion/provisioning/
[fusion@fmwhost provisioning]$ mkdir iam
[fusion@fmwhost provisioning]$ cd iam/
[fusion@fmwhost iam]$ unzip ‘/mnt/hgfs/setup/installers/oam/iamsuite*.zip’
Start the installation by executing runInstaller from <provisioning_repository>/oam/iamsuite/Disk1
[fusion@fmwhost ~]$ cd /app/fusion/provisioning/iam/iamsuite/Disk1/
[fusion@fmwhost Disk1]$ ./runInstaller
…
Please specify JRE/JDK location ( Ex. /home/jre ), <location>/bin/java should exist :/app/fusion/jdk6
Click Next
Select “Skip software update” and click Next
Once prerequisites check finishes, click Next
Enter “/app/fusion/fmw” as Middleware home and “iam” as Home directory. Click Next
Review the summary and click Install. Save response file if required
Once installation completes click Next
Review the summary and click Finish to complete the installation.
The last 2 steps “Provisioning the OIM
Login Modules Under the WebLogic Server Library Directory” and “Creating
the wlfullclient.jar File” will be done now after applying the patches
in next post.
Database Patches
1. PSU 11.2.0.3.4
This patch is already applied as part of database installation
2. Apply other database patches
[fusion@fmwhost patch]$
/app/fusion/database/product/11.2.0/dbhome_1/OPatch/opatch napply
All the patches are already installed as part of database creation using provisioning wizard.
The following patch(es) are already installed in the Oracle Home.
[10263668 11837095 12312133 12317925 12646746 12772404 12889054
12977501 12985184 13014128 13078786 13365700 13404129 13454210 13508115
13615767 13632653 13714926 13743987 13787482 13790109 13918644 14013094
14029429 14058884 14110275 14143796 14164849 14207317 14226599 14499293
14653598 14679292 14698700 14725518 14743385 14793168 14840138 15832953
15885799]
Please roll back the existing identical patch(es) first.
Weblogic Server Patches
We have 2 options to apply Weblogic patches. Here is the first method using GUI.
[fusion@fmwhost weblogic]$
mkdir /app/fusion/fmw/utils/bsu/cache_dir/
[fusion@fmwhost weblogic]$
pwd
/mnt/hgfs/setup/installers/smart_update/weblogic
[fusion@fmwhost weblogic]$
cp -pr *.jar /app/fusion/fmw/utils/bsu/cache_dir/
[fusion@fmwhost weblogic]$
cp -pr *.xml /app/fusion/fmw/utils/bsu/cache_dir/
Start Weblogic Smart Update using bsu command at <MW_HOME>/utils/bsu location
[fusion@fmwhost weblogic]$
cd /app/fusion/fmw/utils/bsu/
[fusion@fmwhost bsu]$
./bsu.sh


Click on the green icon under Apply column for each of the patch to validate and apply the same.


Do the same for all other patches.


Once you see above screen, it means all patches are successfully applied to Weblogic.
Or alternatively we can use following method
The WebLogic server patches are available under the FA
Repository/installers/smart_update/weblogic directory. Follow the patch
Readme and apply all the patches in the directory. Use the following
command to apply all the patches:
java -jar FA Repository/installers/smart_update/suwrapper/bsu-wrapper.jar \
-bsu_home=/bea/mw_home/utils/bsu -meta=./suw_metadata.txt -install \
-patchlist=<WLS Patch List>\
-patch_download_dir=FA Repository/installers/smart_update/weblogic\ -prod_dir=/u01/oim/wlserver_10.3
For the WLS Patch List, provide a comma-separated list of WLS patches from the
following directory in the FA Repository: FA Repository/installers/smart_
update/weblogic
IDM Patches
[fusion@fmwhost bsu]$
cd /mnt/hgfs/setup/installers/pltsec/patch/
[fusion@fmwhost patch]$
ls -ltr
total 0
drwxrwxrwx 1 root root 0 Jan 2 2012 13531666
drwxrwxrwx 1 root root 0 May 11 2012 14034245
drwxrwxrwx 1 root root 0 Jun 27 2012 14249414
drwxrwxrwx 1 root root 0 Oct 9 03:18 14735846
drwxrwxrwx 1 root root 0 Oct 16 12:49 14726667
[fusion@fmwhost patch]$
export ORACLE_HOME=/app/fusion/fmw/idm
[fusion@fmwhost patch]$
$ORACLE_HOME/OPatch/opatch napply
OPatch detects the Middleware Home as “/app/fusion/fmw”
Invoking utility “napply”
Checking conflict among patches…
Conflicts/Supersets for each patch are:
Patch : 14249414
Bug SubSet of 14735846
Subset bugs are:
14203797, 14177175
Patch : 14735846
Bug Superset of 14249414
Super set bugs are:
14203797, 14177175
Skip these patches because they are subset of other patches in the list: 14249414
Proceed with these patches: 13531666 14034245 14726667 14735846
Checking if Oracle Home has components required by patches…
Running prerequisite checks…
Checking conflicts against Oracle Home…
OPatch found that the following patches are not required.
They are either subset of the patches in Oracle Home (or) subset of the patches in the given list
(or) duplicate :
14249414
OPatch continues with these patches: 13531666 14034245 14726667 14735846
Do you want to proceed? [y|n]
y
User Responded with: Y
OPatch detected non-cluster Oracle Home from the inventory and will patch the local system only.
Please shutdown Oracle instances running out of this ORACLE_HOME on the local system.
(Oracle Home = ‘/app/fusion/fmw/idm’)
Is the local system ready for patching? [y|n]
y
UtilSession: N-Apply done.
——————————————————————————–
The following warnings have occurred during OPatch execution:
1) OUI-67302:
OPatch found that the following patches are not required.
They are either subset of the patches in Oracle Home (or) subset of the patches in the given list
(or) duplicate :
14249414
——————————————————————————–
OPatch Session completed with warnings.
OPatch completed with warnings.
Post step for 14735846
[fusion@fmwhost ~]$
cd /app/fusion/fmw/idm/ldap/admin/
[fusion@fmwhost admin]$
sqlplus ods@fusiondb
spool OID_Patch.txt
@oidtblkl.sql
@oidx11116.sql
@ldapxpkg.sql
[fusion@fmwhost admin]$
ls -ltr OID_Patch.txt
-rw-r–r– 1 fusion dba 425948 Mar 4 15:25 OID_Patch.txt
Patch Common Oracle Homes
[fusion@fmwhost patch]$ cd /mnt/hgfs/setup/installers/oracle_common/patch
[fusion@fmwhost patch]$ export ORACLE_HOME=/app/fusion/fmw/oracle_common
[fusion@fmwhost patch]$ ls -ltr
total 0
drwxrwxrwx 1 root root 0 Dec 22 2011 12556084
drwxrwxrwx 1 root root 0 Feb 3 2012 13639146
drwxrwxrwx 1 root root 0 Feb 13 2012 13713159
drwxrwxrwx 1 root root 0 Feb 13 2012 13713541
drwxrwxrwx 1 root root 0 Feb 16 2012 13511837
drwxrwxrwx 1 root root 0 Mar 2 2012 13805105
drwxrwxrwx 1 root root 0 Mar 8 2012 13807335
drwxrwxrwx 1 root root 0 May 9 2012 14054792
drwxrwxrwx 1 root root 0 May 24 2012 14109342
drwxrwxrwx 1 root root 0 Jul 20 2012 14336421
drwxrwxrwx 1 root root 0 Aug 3 2012 14311636
drwxrwxrwx 1 root root 0 Sep 21 06:49 14656857
drwxrwxrwx 1 root root 0 Oct 15 13:07 14763194
drwxrwxrwx 1 root root 0 Oct 18 00:49 14776651
drwxrwxrwx 1 root root 0 Oct 23 09:28 14740858
drwxrwxrwx 1 root root 0 Nov 7 04:57 15842871
drwxrwxrwx 1 root root 0 Nov 16 03:50 15878911
drwxrwxrwx 1 root root 0 Nov 20 18:01 14781147
drwxrwxrwx 1 root root 0 Nov 29 13:11 15935215
drwxrwxrwx 1 root root 0 Nov 30 03:55 15937259
[fusion@fmwhost patch]$ $ORACLE_HOME/OPatch/opatch napply
…
The local system has been patched and can be restarted.
UtilSession: N-Apply done.
OPatch succeeded.
IAM Patches
[fusion@fmwhost patch]$ cd /mnt/hgfs/setup/installers/idm/patch/
[fusion@fmwhost patch]$ ls -ltr
total 2
drwxrwxrwx 1 root root 4096 Jan 23 2012 13399365
drwxrwxrwx 1 root root 0 Feb 2 2012 13115859
drwxrwxrwx 1 root root 0 Jul 19 2012 14345968
drwxrwxrwx 1 root root 0 Oct 10 07:04 14741964
drwxrwxrwx 1 root root 0 Oct 26 15:33 14810463
drwxrwxrwx 1 root root 0 Nov 12 02:55 15860686
drwxrwxrwx 1 root root 0 Nov 26 06:07 15908418
drwxrwxrwx 1 root root 0 Dec 21 17:12 15903122
drwxrwxrwx 1 root root 0 Dec 21 17:12 15938034
drwxrwxrwx 1 root root 0 Dec 21 17:12 12418680
[fusion@fmwhost patch]$ export ORACLE_HOME=/app/fusion/fmw/iam
[fusion@fmwhost patch]$ $ORACLE_HOME/OPatch/opatch napply
Do you want to proceed? [y|n]
y
…
Is the local system ready for patching? [y|n]
y
…
The local system has been patched and can be restarted.
UtilSession: N-Apply done.
OPatch succeeded.
Post step for 13115859 – not required since we have not yet created any domain
Post step for 15903122 – only for existing Fusion Applications installation
Post step for 15938034 – only for systems using DevOps, remaining environments need not apply this
Post-Patch Instructions for IDM and IAM
Patch SOA
[fusion@fmwhost patch]$ cd /mnt/hgfs/setup/installers/soa/patch/
[fusion@fmwhost patch]$ ls -ltr
total 0
drwxrwxrwx 1 root root 0 Mar 20 2012 13263008
drwxrwxrwx 1 root root 0 Aug 16 2012 14501468
drwxrwxrwx 1 root root 0 Nov 20 18:00 14781147
[fusion@fmwhost patch]$ export ORACLE_HOME=/app/fusion/fmw/SOA
[fusion@fmwhost patch]$ $ORACLE_HOME/OPatch/opatch napply
Do you want to proceed? [y|n]
y
…
The local system has been patched and can be restarted.
UtilSession: N-Apply done.
OPatch succeeded.
Patch OHS/Web
[fusion@fmwhost patch]$ cd /mnt/hgfs/setup/installers/webtier/patch/
[fusion@fmwhost patch]$ export ORACLE_HOME=/app/fusion/fmw/web
[fusion@fmwhost patch]$ ls -ltr
total 0
drwxrwxrwx 1 root root 0 Jul 2 2012 14264658
drwxrwxrwx 1 root root 0 Oct 1 02:00 14695345
[fusion@fmwhost patch]$ $ORACLE_HOME/OPatch/opatch napply
Do you want to proceed? [y|n]
y
…
Is the local system ready for patching? [y|n]
Y
…
The local system has been patched and can be restarted.
UtilSession: N-Apply done.
OPatch succeeded.
Applying Workarounds
Provisioning the OIM Login Modules Under the WebLogic Server Library Directory
Due to issues with versions of the configuration wizard, some
environmental variables are not added to the
DOMAIN_HOME/bin/setDomainenv.sh script. This causes certain install
sequences to fail. This is a temporary workaround for that problem.
1. Copy the files located under the
IAM_ORACLE_HOME/server/loginmodule/wls directory to the
MW_HOME/wlserver_10.3/server/lib/mbeantypes directory.
[fusion@fmwhost ~]$
ls -ltr /app/fusion/fmw/wlserver_10.3/server/lib/mbeantypes/
total 2896
-rwxr-x— 1 fusion dba 225160 Mar 3 17:23 xacmlSecurityProviders.jar
-rwxr-x— 1 fusion dba 89950 Mar 3 17:23 wlManagementMBean.jar
-rwxr-x— 1 fusion dba 231618 Mar 3 17:23 wlManagementImplSource.jar
-rwxr-x— 1 fusion dba 54884 Mar 3 17:23 systemPasswordValidatorProvider.jar
-rwxr-x— 1 fusion dba 163566 Mar 3 17:23 saml2IdentityAsserter.jar
-rwxr-x— 1 fusion dba 181014 Mar 3 17:23 saml2CredentialMapper.jar
-rwxr-x— 1 fusion dba 1662107 Mar 3 17:23 cssWlSecurityProviders.jar
-rwxr-x— 1 fusion dba 8139 Mar 3 17:23 commo.dtd
-rwxr-x— 1 fusion dba 306020 Mar 3 17:23 WLSSSecurityProviders.jar
[fusion@fmwhost ~]$
ls -ltr /app/fusion/fmw/iam/server/loginmodule/wls/
total 1604
-rwxrwxrwx 1 fusion dba 430383 Oct 10 07:04 oimsignaturembean.jar
-rwxrwxrwx 1 fusion dba 432248 Oct 10 07:04 oimsigmbean.jar
-rwxrwxrwx 1 fusion dba 421374 Oct 10 07:04 oimmbean.jar
-rwxrwxrwx 1 fusion dba 333397 Oct 10 07:04 OIMAuthenticator.jar
[fusion@fmwhost ~]$
cp -pr /app/fusion/fmw/iam/server/loginmodule/wls/* /app/fusion/fmw/wlserver_10.3/server/lib/mbeantypes/
2. Change directory to MW_HOME/wlserver_10.3/server/lib/mbeantypes/
[fusion@fmwhost ~]$
cd /app/fusion/fmw/wlserver_10.3/server/lib/mbeantypes/
3. Change the permissions on these files to 750 by using the chmod command.
[fusion@fmwhost mbeantypes]$
chmod 750 *
Creating the wlfullclient.jar File
Oracle Identity Manager uses the wlfullclient.jar library for certain
operations. Oracle does not ship this library, so you must create this
library manually. We will see mention of this during provisioning.
[fusion@fmwhost ~]$
cd /app/fusion/fmw/wlserver_10.3/server/lib
[fusion@fmwhost lib]$
ls -l wlfullclient.jar
wlfullclient.jar: No such file or directory
[fusion@fmwhost lib]$
java -jar wljarbuilder.jar
…
Created new jar file: /app/fusion/fmw/wlserver_10.3/server/lib/wlfullclient.jar
[fusion@fmwhost lib]$
ls -l wlfullclient.jar
-rw-r–r– 1 fusion dba 55004433 Mar 4 17:14 wlfullclient.jar
This concludes the installation of Oracle Identity Management
components. Instead of directly configuring these components, we need to
apply the mandatory patches first. These patches are listed in the
latest release notes. Please refer to the latest release notes for the
list of updated patches when you are installing.
Please note that the Webgate Patch is pending since we are yet to
install webgate. We will install if required after installing webgate
later
Configure Oracle Identity and Access Management components
Configuring Oracle Identity Management
components” can be divided into following tasks. Please note that we
will not configure Oracle Virtual Directory, Oracle Identity Federation
etc.
- Configure the Web Tier
- Create Weblogic Domain for Identity Management
- Extend the Domain to include Oracle Internet Directory
- Prepare Identity and Policy Stores
- Extend the Domain to include Oracle Directory Service Manager (ODSM)
- Extend the Domain to include Oracle Virtual Directory (Optional)
- Configure Oracle Access Manager 11g (OAM)
- Configure Oracle Identity Manager (OIM) and Oracle SOA Suite
-
Post-configure tasks
Configure Web Tier
Start the configuration from <Web_Home>/bin
[fusion@fmwhost ~]$ cd /app/fusion/fmw/web/bin/
[fusion@fmwhost bin]$ ./config.sh


Click Next

Select only Oracle HTTP Server and deselect other checkboxes. Click Next

Enter following details and click Next
Instance Home Location: /app/fusion/config/instances/web1
(Please note that the paths, instance/component name etc are different from what we used during 11.1.5 installation steps)
Instance Name: web1
OHS Component Name: ohs1

Select “Specify Ports using Configuration file”. Open another shell window and copy the staticports.ini from staging directory.
[fusion@fmwhost bin]$ cp -p /mnt/hgfs/setup/installers/webtier/Disk1/stage/Response/staticports.ini ~/
Click View/Edit File

Edit/uncomment the following values.
OPMN Local Port = 6700
OHS Port = 7777
Click Save


Deselect the check box and click Next

Click Yes

Review the summary and click Configure

Once installation is successful, click Next

Review the summary and click Finish
Check if the HTTP processes already started.
[fusion@fmwhost bin]$ ps -ef | grep http
fusion 5410 5383 1 13:13 ? 00:00:00 /app/fusion/fmw/web/ohs/bin/httpd.worker -DSSL
fusion 5419 5410 0 13:13 ? 00:00:00 /app/fusion/fmw/web/ohs/bin/httpd.worker -DSSL
fusion 5420 5410 0 13:13 ? 00:00:00 /app/fusion/fmw/web/ohs/bin/httpd.worker -DSSL
fusion 5422 5410 0 13:13 ? 00:00:00 /app/fusion/fmw/web/ohs/bin/httpd.worker -DSSL
fusion 5518 4052 0 13:14 pts/1 00:00:00 grep http
[fusion@fmwhost bin]$ vi /app/fusion/config/instances/web1/config/OHS/web1/httpd.conf
Change to following (dba or oinstall based on fusion user group)
User fusion
Group dba
Launch http://<hostname>:7777 to make sure that HTTP home page is appearing.

Make a backup of httpd.conf
[fusion@fmwhost bin]$ cp -pr
/app/fusion/config/instances/web1/config/OHS/web1/httpd.conf
/app/fusion/config/instances/web1/config/OHS/web1/httpd.conf.bak.original
…
<IfModule mpm_worker_module>
ServerLimit 20
StartServers 2
MaxClients 1000
MinSpareThreads 200
MaxSpareThreads 800
ThreadsPerChild 50
MaxRequestsPerChild 10000
AcceptMutex fcntl
LockFile “${ORACLE_INSTANCE}/diagnostics/logs/${COMPONENT_TYPE}/${COMPONENT_NAME}/http_lock”
</IfModule>
Restart Web server as follows.
Create Weblogic Domain for Identity Management
Start the configuration from <Middleware Home>/oracle_common/commin/bin
[fusion@fmwhost bin]$ /app/fusion/config/instances/web1/bin/opmnctl stopall
opmnctl stopall: stopping opmn and all managed processes…
[fusion@fmwhost bin]$ /app/fusion/config/instances/web1/bin/opmnctl startall
opmnctl startall: starting opmn and all managed processes…
[fusion@fmwhost bin]$ cd /app/fusion/fmw/oracle_common/common/bin/
[fusion@fmwhost bin]$ ./config.sh &


Select “Create a new Weblogic domain” and click Next

For single domain creation, select:
– Oracle Identity Manager 11.1.1.3.0 [iam]
– Oracle SOA Suite – 11.1.1.0 [soa]
– Oracle Enterprise Manager [oracle_common]
– Oracle Access Manager with Database Policy Store – 11.1.1.3.0 [iam]
– Oracle WSM Policy Manager – 11.1.1.0 [oracle_common]
– Oracle JRF [oracle_common] (This should be selected automatically.)
Click Next


Enter following values.
Domain Name: IDMDomain
Domain location: /app/fusion/config/domains
Application location: /app/fusion/config/domains/IDMDomain/applications
[Please note that above paths are different from what we used in previous installations]
Click Next

Enter name “weblogic” and desired password. Click Next

Select “Production Mode” and make sure correct JDK is selected. Click Next

Make sure to change each username to FA_
manually since we have modified the prefix earlier. Once that is
changed, select all checkboxes to apply same password. Enter database
server details and click Next


Once connection test is successful, click Next

Select “Administration Server” and “Managed servers, clusters and Machines”. Click Next

Enter following values.
Name: AdminServer
Listen address: <hostname>
Listen Port: <7001>
We are not using SSL here so click Next

In the “Configure Managed Servers” screen enter following values.
WLS_OAM1, <hostname>, 14100 (OAM Server)
WLS_SOA1, <hostname>, 8001 (SOA Server)
WLS_OIM1, <hostname>, 14000 (OIM Server)
Click Next

Click Next

Since we are using Unix machine, we must delete this entry. Click Delete

This tab should look like this now.

Click on “Unix Machine” tab and enter following values. And click Next
Name: <hostname>
Node Manager listen address: <hostname>
Node manager listen port: 5556
Import Note: Make sure to use machine name same as
hostname. In this case change this to fmwhost.paramlabs.com instead of
just fmwhost. Check this using “hostname” command on your OS, even
though both point to same IP, the node manager treats both name as
different machines.

Select all managed servers on left side and click on right arrow to assign all servers to our single node.

It should look as above. Click Next

Review the summary and click “Create“

Once creation is complete, click Done
Prepare Admin server for startup without prompting password
[fusion@fmwhost bin]$ mkdir -p /app/fusion/config/domains/IDMDomain/servers/AdminServer/security
[fusion@fmwhost bin]$ cd /app/fusion/config/domains/IDMDomain/servers/AdminServer/security
[fusion@fmwhost security]$ vi boot.properties
[fusion@fmwhost security]$ more boot.properties
username=weblogic
password=Oracle123 (whichever password you chose)
Note: The
username and password entries in the file are not encrypted until you
start the Administration Server. For security reasons, minimize the time
the entries in the file are left unencrypted. After you edit the file,
start the server as soon as possible so that the entries are encrypted.
Configure and start Node Manager
[fusion@fmwhost security]$ cd /app/fusion/fmw/wlserver_10.3/server/bin/
[fusion@fmwhost bin]$ ./startNodeManager.sh
…
INFO: Secure socket listener started on port 5556
…
Once you see above messege, press CTRL+C to kill the process (if you started with “&” then kill using kill -9 command)
^C+ set +x
Set the node manager properties
[fusion@fmwhost bin]$ cd /app/fusion/fmw/oracle_common/common/bin
[fusion@fmwhost bin]$ ./setNMProps.sh
Appending required nodemanager.properties
To confirm the changes,
[fusion@fmwhost bin]$ tail -f /app/fusion/fmw/wlserver_10.3/common/nodemanager/nodemanager.properties
…
#Required NM Property overrides (append to existing nodemanager.properties)
StartScriptEnabled=true
Start node manager in nohup mode so that it keeps running after you close the shell.
[fusion@fmwhost bin]$ cd /app/fusion/fmw/wlserver_10.3/server/bin/
[fusion@fmwhost bin]$ nohup ./startNodeManager.sh &
Start Weblogic Admin server
[fusion@fmwhost bin]$ cd /app/fusion/config/domains/IDMDomain/bin/
[fusion@fmwhost bin]$ nohup ./startWebLogic.sh &
Wait till you see this message.
…
<Notice> <WebLogicServer> <BEA-000360> <Server started in RUNNING mode>
==========
Note: If you ever get error like
<Info> <Management> <BEA-141281> <unable to get file lock, will retry …>
Then do the following
Kill any running processes for startWeblogic.sh and then remove the lock files as follows.
-bash-3.2$ rm /app/fusion/config/domains/IDMDomain/servers/AdminServer/tmp/AdminServer.lok
This error appears if you the admin server or managed server did not stop properly earlier.
==========
Make sure Admin server is started properly by launching the URL http://<hostname>:7001/console

Login with “weblogic” user

Launch Enterprise Manager URL
http://<hostname>:7001/em

Login with “weblogic” user


Setup HTTP Aliases
Create a file named admin.conf at <web instance directory>/config/OHS/ohs1/moduleconf and enter following lines
[fusion@fmwhost bin]$ more /app/fusion/config/instances/web1/config/OHS/web1/moduleconf/admin.conf
RewriteEngine On
RewriteOptions inherit
RewriteRule ^/em/targetauth/emaslogout.jsp “/oamsso/logout.html?end_url=/em” [R]
RewriteRule ^/console/jsp/common/logout.jsp “/oamsso/logout.html?end_url=/console” [R]
###################################
## General Domain Configuration
###################################
# Admin Server and EM
<Location /console>
SetHandler weblogic-handler
WebLogicHost fmwhost.paramlabs.com
WeblogicPort 7001
</Location>
<Location /consolehelp>
SetHandler weblogic-handler
WebLogicHost fmwhost.paramlabs.com
WeblogicPort 7001
</Location>
<Location /em>
SetHandler weblogic-handler
WebLogicHost fmwhost.paramlabs.com
WeblogicPort 7001
</Location>
Restart Web server
[fusion@fmwhost bin]$ /app/fusion/config/instances/web1/bin/opmnctl stopall
opmnctl stopall: stopping opmn and all managed processes…
[fusion@fmwhost bin]$ /app/fusion/config/instances/web1/bin/opmnctl startall
opmnctl startall: starting opmn and all managed processes…
Now you can launch the same URL using our main http port 7777
http://<hostname>:7777/console should open fine now

Register HTTP server with Enterprise Manager
[fusion@fmwhost bin]$ ./opmnctl registerinstance -adminHost fmwhost -adminport 7001 -adminUsername weblogic
Command requires login to weblogic admin server (fmwhost):
Username: weblogic
Password:
…
Done
Registering instance
Command succeeded.
Removing IDM Domain Agent
In the Administration console, click on “Security Realms” -> myrealm -> Providers

Select IAMSuiteAgent and click on Delete.

Activate Changes
Enable Weblogic Plugin
Click Lock & Edit. Click on IDMDomain -> Configuration -> Web Applications

Scroll down and check “Weblogic Plugin Enabled“

Click on Environment -> Servers -> AdminServer -> Protocols -> HTTP. Change the Frontend port to 7777.
Activate Changes
Restart Welogic Admin Server
[fusion@fmwhost bin]$ cd /app/fusion/config/domains/IDMDomain/bin/
[fusion@fmwhost bin]$ ./stopWebLogic.sh
[fusion@fmwhost bin]$ nohup ./startWebLogic.sh &
Extend the Domain to include Oracle Internet Directory
Make sure that the port 3060 is not being used by other process.
[fusion@fmwhost bin]$ netstat -an | grep “3060″
Start the configuration from <IDM_HOME>/bin
[fusion@fmwhost bin]$ cd /app/fusion/fmw/idm/bin
[fusion@fmwhost bin]$ ./config.sh &


Click Next

Select “Configure Without A Domain” and click Next

Instance Location: /app/fusion/config/instances/oid1
Instance Name: oid1
Click Next

Deselect checkbox and click Next

Click Yes

Select “Oracle Internet Directory” and click Next

Select “Specify Ports using Configuration file”
Open a shell and copy the staticports.ini file to home directory
[fusion@fmwhost bin]$ cp -p /app/fusion/provisioning/idm/Disk1/stage/Response/staticports.ini ~/
Click View/Edit File

Enter/uncomment Value for Non-SSL Port as 3060
And for SSL Port put value as 3061
Click Save


Enter database details and click Next

Set Realm as the domain level DC (for example if domain is example.com then set dc=example, dc=com)
Click Next

Review the summary and click Configure

Once configuration completes, click Next

Review the summary and click Finish
Validate OID
[fusion@fmwhost bin]$ export ORACLE_HOME=/app/fusion/fmw/idm
[fusion@fmwhost bin]$ export ORACLE_INSTANCE=/app/fusion/config/instances/oid1
[fusion@fmwhost bin]$ export PATH=$ORACLE_HOME/opmn/bin:$ORACLE_HOME/bin:$ORACLE_HOME/ldap/bin:$ORACLE_HOME/ldap/admin:$PATH
[fusion@fmwhost bin]$ ldapbind -h fmwhost -p 3060 -D “cn=orcladmin” -q
Please enter bind password:
bind successful
[fusion@fmwhost bin]$ ldapbind -h fmwhost -p 3061 -D “cn=orcladmin” -q -U 1
Please enter bind password:
bind successful
[fusion@fmwhost bin]$ opmnctl reload
opmnctl reload: reconfiguring opmn…
[fusion@fmwhost bin]$ opmnctl status agent
Processes in Instance: oid1
———————————+——————–+———+———
ias-component | process-type | pid | status
———————————+——————–+———+———
oid1 | oidldapd | 11217 | Alive
oid1 | oidldapd | 11221 | Alive
oid1 | oidmon | 11203 | Alive
EMAGENT | EMAGENT | 10839 | Alive
Registering Oracle Internet Directory with the WebLogic Server Domain
[fusion@fmwhost bin]$ export ORACLE_HOME=/app/fusion/fmw/idm
[fusion@fmwhost bin]$ export ORACLE_INSTANCE=/app/fusion/config/instances/oid1
[fusion@fmwhost bin]$ $ORACLE_INSTANCE/bin/opmnctl registerinstance -adminHost fmwhost -adminPort 7001 -adminUsername weblogic
Command requires login to weblogic admin server (fmwhost):
Username: weblogic
Password:
Registering instance
Command succeeded.
Update the Enterprise Manager Repository URL
[fusion@fmwhost bin]$ cd $ORACLE_INSTANCE/EMAGENT/EMAGENT/bin
[fusion@fmwhost bin]$ ./emctl switchOMS http://fmwhost:7001/em/upload
Oracle Enterprise Manager 10g Release 5 Grid Control 10.2.0.5.0.
Copyright (c) 1996, 2009 Oracle Corporation. All rights reserved.
SwitchOMS succeeded.
We can now verify whether this instance is registered for monitoring agent.
Login to http://<hostname>:7777/em using weblogic user


Click on Farm->Agent monitored targets.

Make sure that Agent URL is configured and it does not show “Needs Configuration”
Tune Oracle Internet Directory for Fusion Applications Installation

In EM console, select oid1 from farm tree. On right pan click on oid1->Administration->Shared Properties

Select Skip referral for search (in OID term orclskiprefinsql = 1)

Deselect Match DN (orclMatchDnEnabled = 0)
Click Apply

Now click on oid1->Administration->Server Properties

Set following values.
Number of Oracle Internet Directory LDAP Server Processes orclserverprocs 4
Number of DB Connections per Server Process orclmaxcc 4
Maximum Number of LDAP connections per Server Process orclmaxldapconns 4096
Restart OID processes to make sure that the changes are now in effect.
[fusion@fmwhost bin]$ /app/fusion/config/instances/oid1/bin/opmnctl stopall
opmnctl stopall: stopping opmn and all managed processes…
[fusion@fmwhost bin]$ /app/fusion/config/instances/oid1/bin/opmnctl startall
opmnctl startall: starting opmn and all managed processes…
[fusion@fmwhost bin]$ opmnctl status agent
Processes in Instance: oid1
———————————+——————–+———+———
ias-component | process-type | pid | status
———————————+——————–+———+———
oid1 | oidldapd | 17192 | Alive
oid1 | oidldapd | 17188 | Alive
oid1 | oidldapd | 17184 | Alive
oid1 | oidldapd | 17166 | Alive
oid1 | oidldapd | 17142 | Alive
oid1 | oidmon | 17104 | Alive
EMAGENT | EMAGENT | 17103 | Alive
Prepare Identity and Policy Stores
Prepare Policy store
Go to directory <IAM_HOME>/idmtools/bin
-bash-3.2$ cd /app/fusion/fmw/iam/idmtools/bin/
Source environment variables
-bash-3.2$ export ORACLE_HOME=/app/fusion/fmw/iam
-bash-3.2$ export JAVA_HOME=/app/fusion/jdk6
-bash-3.2$ export IDM_HOME=/app/fusion/fmw/idm
-bash-3.2$ export MW_HOME=/app/fusion/fmw
Create a file named policystore.props
[fusion@fmwhost bin]$ more policystore.props
POLICYSTORE_HOST: fmwhost.paramlabs.com
POLICYSTORE_PORT: 3060
POLICYSTORE_BINDDN: cn=orcladmin
POLICYSTORE_READONLYUSER: PolicyROUser
POLICYSTORE_READWRITEUSER: PolicyRWUser
POLICYSTORE_SEARCHBASE: dc=paramlabs,dc=com
POLICYSTORE_CONTAINER: cn=idm_jpsroot
[fusion@fmwhost bin]$ ./idmConfigTool.sh -configPolicyStore input_file=policystore.props
Enter Policy Store Bind DN password :
…
Enter User Password for PolicyROUser:
Confirm User Password for PolicyROUser:
…
Enter User Password for PolicyRWUser:
Confirm User Password for PolicyRWUser:
Check for errors in the log file.
-bash-3.2$ grep -i error automation.log
Note: While running this command, you might see the following error message:
WARNING: Error in adding in-memory OID search filters.
You may safely ignore this error.
Run following commands to reassociate Security Store
[fusion@fmwhost bin]$ cd /app/fusion/fmw/oracle_common/common/bin/
[fusion@fmwhost bin]$ ./wlst.sh
wls:/offline> connect(“weblogic”,”Oracle123″,”t3://fmwhost.paramlabs.com:7001″)
Connecting to t3://fmwhost.paramlabs.com:7001 with userid weblogic …
Successfully connected to Admin Server ‘AdminServer’ that belongs to domain ‘IDMDomain’.
Warning: An insecure protocol was used to connect to the
server. To ensure on-the-wire security, the SSL port or
Admin port should be used instead.
wls:/IDMDomain/serverConfig> reassociateSecurityStore(domain=”IDMDomain”,
admin=”cn=orcladmin”,password=”Oracle123″,
ldapurl=”ldap://fmwhost.paramlabs.com:3060″,servertype=”OID”,
jpsroot=”cn=idm_jpsroot”)
wls:/IDMDomain/serverConfig> exit()
Restart Admin Server
Prepare Identity Store
[fusion@fmwhost bin]$ more idstore.props
# Common
IDSTORE_HOST: fmwhost.paramlabs.com
IDSTORE_PORT: 3060
IDSTORE_BINDDN: cn=orcladmin
IDSTORE_GROUPSEARCHBASE: cn=Groups,dc=paramlabs,dc=com
IDSTORE_SEARCHBASE: dc=paramlabs,dc=com
IDSTORE_USERNAMEATTRIBUTE: cn
IDSTORE_LOGINATTRIBUTE: uid
IDSTORE_USERSEARCHBASE: cn=Users,dc=paramlabs,dc=com
POLICYSTORE_SHARES_IDSTORE: true
# OAM
IDSTORE_OAMADMINUSER:oamadmin
IDSTORE_OAMSOFTWAREUSER:oamLDAP
OAM11G_IDSTORE_ROLE_SECURITY_ADMIN:OAMAdministrators
# OAM and OIM
IDSTORE_SYSTEMIDBASE: cn=systemids,dc=paramlabs,dc=com
# OIM
IDSTORE_OIMADMINGROUP: OIMAdministrators
IDSTORE_OIMADMINUSER: oimLDAP
# Required due to bug
IDSTORE_OAAMADMINUSER : oaamadmin
# Fusion Applications
IDSTORE_READONLYUSER: IDROUser
IDSTORE_READWRITEUSER: IDRWUser
IDSTORE_SUPERUSER: weblogic_fa
# Weblogic
IDSTORE_WLSADMINUSER : weblogic_idm
[fusion@fmwhost bin]$ ./idmConfigTool.sh -preConfigIDStore input_file=idstore.props
Enter ID Store Bind DN password :
Check the log for errors
[fusion@fmwhost bin]$ grep -i error automation.log
The above commands will automatically create a file named idmDomainConfig.param file. This is an important file and we will seed the values from this file to the response file.
[fusion@fmwhost bin]$ more idmDomainConfig.param
IDSTORE_GROUPSEARCHBASE: cn=Groups,dc=paramlabs,dc=com
POLICYSTORE_PORT: 3060
IDSTORE_HOST: fmwhost.paramlabs.com
IDSTORE_LOGINATTRIBUTE: uid
IDSTORE_PORT: 3060
POLICYSTORE_CONTAINER: cn=idm_jpsroot
IDSTORE_USERSEARCHBASE: cn=Users,dc=paramlabs,dc=com
POLICYSTORE_HOST: fmwhost.paramlabs.com
POLICYSTORE_READWRITE_USERNAME: cn=PolicyRWUser,cn=users,dc=paramlabs,dc=com
Creating Users and Groups
Run following command.
[fusion@fmwhost bin]$ ./idmConfigTool.sh -prepareIDStore mode=all input_file=idstore.props
Enter ID Store Bind DN password :
…
Enter User Password for IDROUser:
Confirm User Password for IDROUser:
…
Enter User Password for IDRWUser:
Confirm User Password for IDRWUser:
…
Enter User Password for weblogic_fa:
Confirm User Password for weblogic_fa:
…
Enter User Password for weblogic_idm:
Confirm User Password for weblogic_idm:
…
Enter User Password for oblixanonymous:
Confirm User Password for oblixanonymous:
…
Enter User Password for oamadmin:
Confirm User Password for oamadmin:
…
Enter User Password for oamLDAP:
Confirm User Password for oamLDAP:
…
Enter User Password for oaamadmin:
Confirm User Password for oaamadmin:
…
Enter User Password for oimLDAP:
Confirm User Password for oimLDAP:
…
Enter User Password for xelsysadm:
Confirm User Password for xelsysadm:
The tool has completed its operation. Details have been logged to automation.log
[fusion@fmwhost bin]$ grep -i error automation.log
WARNING: Error in adding in-memory OID search filters
Note: We are not using Oracle Virtual Directory (OVD) since this is optional component so skipping OVD part
Extend the Domain to include Oracle Directory Service Manager (ODSM)
Make sure that the port 7006 is not being used by any process.
[fusion@fmwhost bin]$ netstat -an | grep 7006
Start the configuration from <IDM_HOME>/bin
[fusion@fmwhost bin]$ cd /app/fusion/fmw/idm/bin/
[fusion@fmwhost bin]$ ./config.sh &


Click Next

Select “Extend Existing Domain” and enter following values
Hostname: <hostname>
Port: 7001
Username: weblogic
Password: same as existing weblogic password
Click Next

Click Yes

Enter following values.
Weblogic Server Directory: /app/fusion/fmw/wlserver_10.3
Instance location: /app/fusion/config/instances/ods1
Instance Name: ods1
Click Next

Deselect checkbox and click Next

Click Yes

Select only Oracle Directory Service Manager and click Next

Select “Specify Ports using Configuration file”. Open another shell window and copy the staticports.ini from staging directory.
[fusion@fmwhost bin]$ cp -p /app/fusion/provisioning/idm/Disk1/stage/Response/staticports.ini ~/
Click View/Edit File

Edit/uncomment ODS server Port No = 7006
Click Save


Review the summary and click Configure

Once configuration completes, click Next

Review the summary and click Finish
If not up the start by following commands.
[fusion@fmwhost IDMDomain]$ cp -pr
/app/fusion/config/domains/IDMDomain/servers/AdminServer/security/boot.properties
/app/fusion/config/domains/IDMDomain/servers/wls_ods1/security/
[fusion@fmwhost IDMDomain]$ cd /app/fusion/config/domains/IDMDomain/bin/
[fusion@fmwhost IDMDomain]$ nohup ./startManagedWebLogic.sh wls_ods1 &
Wait till you see RUNNING in the nohup.log file
Launch ODSM using following URL

Create Aliases for ODSM in HTTP server
[fusion@fmwhost bin]$ vi /app/fusion/config/instances/web1/config/OHS/web1/moduleconf/admin.conf
<Append following lines>
# ODSM
<Location /odsm>
SetHandler weblogic-handler
WebLogicCluster fmwhost.paramlabs.com:7006
</Location>
Restart Web Server as follows
[fusion@fmwhost bin]$ /app/fusion/config/instances/web1/bin/opmnctl stopall
opmnctl stopall: stopping opmn and all managed processes…
[fusion@fmwhost bin]$ /app/fusion/config/instances/web1/bin/opmnctl startall
opmnctl startall: starting opmn and all managed processes…
Now you can also launch ODSM using following URL
http://<hostname>:7777/odsm

Click on Connect to a directory ->
Create A New Connection

Enter values as above. Click Connect

You can now view the Oracle Internet Directory from ODSM

You can also browse the OID data as above
Configure Oracle Access Manager (OAM)
Append following entries in /app/fusion/config/instances/web1/config/OHS/web1/moduleconf/admin.conf
##############################################
## Entries Required by Oracle Access Manager
##############################################
# OAM console
<Location /oamconsole>
SetHandler weblogic-handler
WebLogicHost fmwhost.paramlabs.com
WebLogicPort 7001
</Location>
##############################################
## Entries Required by Oracle Access Manager
##############################################
# OAM
<Location /oam>
SetHandler weblogic-handler
#WLProxySSL ON
#WLProxySSLPassThrough ON
WebLogicCluster fmwhost.paramlabs.com:14100
</Location>
##############################################
## Entries Required by Fusion Applications
##############################################
# FAAuthScheme
<Location /fusion_apps>
SetHandler weblogic-handler
#WLProxySSL ON
#WLProxySSLPassThrough ON
WebLogicCluster fmwhost.paramlabs.com:14100
</Location>
Restart Web Server as follows.
[fusion@fmwhost ldap_config_util]$ /app/fusion/config/instances/web1/bin/opmnctl stopall
opmnctl stopall: stopping opmn and all managed processes…
[fusion@fmwhost ldap_config_util]$ /app/fusion/config/instances/web1/bin/opmnctl startall
opmnctl startall: starting opmn and all managed processes…
Go to <IAM_HOME>/idmtools/bin
[fusion@fmwhost bin]$ export ORACLE_HOME=/app/fusion/fmw/iam
[fusion@fmwhost bin]$ export MW_HOME=/app/fusion/fmw
[fusion@fmwhost bin]$ export JAVA_HOME=/app/fusion/jdk6
[fusion@fmwhost bin]$ cd /app/fusion/fmw/iam/idmtools/bin
Create a file named config_oam1.props
[fusion@fmwhost bin]$ more config_oam1.props
WLSHOST: fmwhost.paramlabs.com
WLSPORT: 7001
WLSADMIN: weblogic
WLSPASSWD: Oracle123
IDSTORE_HOST: fmwhost.paramlabs.com
IDSTORE_PORT: 3060
IDSTORE_DIRECTORYTYPE:OID
IDSTORE_BINDDN: cn=orcladmin
IDSTORE_USERNAMEATTRIBUTE: cn
IDSTORE_LOGINATTRIBUTE: uid
IDSTORE_USERSEARCHBASE: cn=Users,dc=paramlabs,dc=com
IDSTORE_SEARCHBASE: dc=paramlabs,dc=com
IDSTORE_GROUPSEARCHBASE: cn=Groups,dc=paramlabs,dc=com
IDSTORE_OAMSOFTWAREUSER: oamLDAP
IDSTORE_OAMADMINUSER: oamadmin
PRIMARY_OAM_SERVERS: fmwhost.paramlabs.com:5575
WEBGATE_TYPE: ohsWebgate11g
ACCESS_GATE_ID: Webgate_IDM
OAM11G_IDM_DOMAIN_OHS_HOST:fmwhost.paramlabs.com
OAM11G_IDM_DOMAIN_OHS_PORT:7777
OAM11G_IDM_DOMAIN_OHS_PROTOCOL:http
OAM11G_WG_DENY_ON_NOT_PROTECTED: false
OAM_TRANSFER_MODE: open
OAM11G_OAM_SERVER_TRANSFER_MODE:open
OAM11G_IDM_DOMAIN_LOGOUT_URLS:/console/jsp/common/logout.jsp,/em/targetauth/emaslogout.jsp
OAM11G_OIM_WEBGATE_PASSWD: Oracle123
COOKIE_DOMAIN: .paramlabs.com
OAM11G_IDSTORE_ROLE_SECURITY_ADMIN: OAMAdministrators
OAM11G_SSO_ONLY_FLAG: true
OAM11G_OIM_INTEGRATION_REQ: true
OAM11G_IMPERSONATION_FLAG:true
OAM11G_SERVER_LBR_HOST:fmwhost.paramlabs.com
OAM11G_SERVER_LBR_PORT:7777
OAM11G_SERVER_LBR_PROTOCOL:http
COOKIE_EXPIRY_INTERVAL: 120
OAM11G_OIM_OHS_URL:http://fmwhost.paramlabs.com:7777/
OAM11G_SERVER_LOGIN_ATTRIBUTE: uid
Keep a backup of idmDomainConfig.param for safety
[fusion@fmwhost bin]$ cp -pr idmDomainConfig.param idmDomainConfig.param.preOAM
Run the following command to Configure OAM
[fusion@fmwhost bin]$ ./idmConfigTool.sh -configOAM input_file=config_oam1.props
Enter ID Store Bind DN password :
Enter User Password for IDSTORE_PWD_OAMSOFTWAREUSER:
Confirm User Password for IDSTORE_PWD_OAMSOFTWAREUSER:
Enter User Password for IDSTORE_PWD_OAMADMINUSER:
Confirm User Password for IDSTORE_PWD_OAMADMINUSER:
…
The tool has completed its operation. Details have been logged to automation.log
[fusion@fmwhost bin]$ grep -i error automation.log
WARNING: Error in adding in-memory OID search filters
Restart Admin server and all managed servers
Validate OAM
Login to OAM Console using oamadmin user
http://fmwhost:7777/oamconsole/


In System Configuration tab, click Access Manager Settings -> SSO Agents-> OAM Agents. Search for all agents.
Edit Webgate_IDM agent

Set Max. number of Connections to 4 for each primary servers (in our case only one host is there)

Do the same for Webgate_IDM_11g agent
Set Max. number of Connections to 4 for each primary servers (in our case only one host is there)

In Policy Configurations tab, Host identifiers->IAMSuiteAgent-> Make sure our hostname and the default http port is mentioned. If already there then nothing to change in this screen.
Adding the oamadmin Account to Access System Administrators
The oamadmin user is
assigned to the Oracle Access Manager Administrators group, which is in
turn assigned to the Access System Administrators group. Fusion
Applications, however, requires the oamadmin user to be explicitly added
to that role.
To do this, perform the following steps:
1. Log in to the oamconsole at http://<hostname>:7777/oamconsole
2. Click the System Configuration tab.
3. Expand Data Sources - User Identity Stores.
4. Click OIMIDStore.
5. Click Open.
6. Click the + symbol next to Access System Adminsitrators.
7. Type oamadmin in the search box and click Search.
8. Click the returned oamadmin row, then click Add Selected.
9. Click Apply.


Click Apply.
Create Oracle Access Manager Policies for WebGate 11g
In order to allow WebGate 11g to display the credential collector, you must add /oam to the list of public policies.
Proceed as follows:
1. Log in to the OAM console
2. Select the Policy Configuration tab.
3. Expand Application Domains – IAM Suite
4. Click Resources.
5. Click Open.
6. Click New resource.
7. Provide the following values:
Type:
HTTP
Description:
OAM Credential Collector
Host Identifier:
IAMSuiteAgent
Resource URL:
/oam
Protection Level:
Unprotected
Authentication Policy:
Public Policy
8. Click Apply.


Click Apply
Updating Oracle Access Manager System Parameters
1. Log in to the OAM console at http://<hostname>:7777/oamconsole as the WebLogic administration user.
2. Select the System Configuration tab.
3. Click Common Settings under the Common Configuration entry.
4. Click Open.
5. Set the following values:
Idle Timeout (minutes): 120
Session Lifetime: 120
Maximum Number of Sessions per user: 200
6. Click Apply

Restart OAM
Configure Oracle Identity Manager (OIM) and Oracle SOA Suite
Start the configuration from <IAM_HOME>/bin
[fusion@fmwhost bin]$ cd /app/fusion/fmw/iam/bin/
[fusion@fmwhost bin]$ ./config.sh &


Click Next

Select only “OIM Server” and click Next

Enter database details. Make sure to use correct prefix as we selected earlier (in our case PROD). ClickNext

Admin server URL: t3://<hostname>:7001
Username and password of weblogic user
Click Next

Enter required password and OIM HTTP URL as http://<hostname>:14000
Click Next

Check “Enable LDAP Sync” and click Next

Enter following values
Directory Server Type: OID
ID: oid1
URL: ldap://<hostname>:3060
User: cn=oimLDAP,cn=systemids,dc=<domain>,dc=<com>
Click Next

Enter following values
Role Container: cn=Groups,dc=<domain>,dc=<com>
User Container: cn=Users,dc=<domain>,dc=<com>
Reservation Container: cn=Reserve,dc=<domain>,dc=<com>
Click Next

Review summary and click Configure

Once configure completes, click Next

Review and click Finish
Launch OIM URL
http://<hostname>:14000/oim
Important Note: If you get HTTP 404
error for OIM or if you see following errors in OIM log
files (even if OIM status shows as “RUNNING” in admin console) then OIM
has not come up properly. You can see this in EM and it will show OIM
as down.
<Error> <Deployer> <BEA-149265> <Failure
occurred in the execution of deployment request with ID ’1356332711618′
for task ’1′. Error is: ‘weblogic.management.DeploymentException:
[J2EE:160149]Error while processing library references. Unresolved
application library references, defined in weblogic-application.xml:
[Extension-Name: oracle.sdp.client, exact-match: false].’
weblogic.management.DeploymentException: [J2EE:160149]Error while
processing library references. Unresolved application library
references, defined in weblogic-application.xml: [Extension-Name:
oracle.sdp.client, exact-match: false].
at weblogic.application.internal.flow.CheckLibraryReferenceFlow.prepare(CheckLibraryReferenceFlow.java:26)
at weblogic.application.internal.BaseDeployment$1.next(BaseDeployment.java:648)
at weblogic.application.utils.StateMachineDriver.nextState(StateMachineDriver.java:52)
at weblogic.application.internal.BaseDeployment.prepare(BaseDeployment.java:191)
at weblogic.application.internal.EarDeployment.prepare(EarDeployment.java:59)
Truncated. see log file for complete stacktrace
As per metalink Note: 1328471.1 following needs to be done to fix this.
Admin console->Deplyments->go to oracle.sdp.client page


Select Lock & Edit on left pan and on right pan click the checkboxes for WLS_OIM1 and WLS_SOA1
Restart OIM
Now launch OIM URL again.

Login with xelsysadm user

Enter answers for challenge questions.
If you have not applied post-steps for patch 13399365 properly then you might get following errors.

oracle.iam.platform.kernel.OrchestatrionException
“ADF_FACES-60097 : For more information, please see the server’s
error log for an entry beginning with: ADF_FACES-60096: Server Exception
during PPR, #8″
Internal Exception: java.sql.SQLSyntaxErrorException: ORA-00904: “CONTEXTVAL”: invalid identifier
Error Code: 904
Call: INSERT INTO ORCHPROCESS (ID, BULKPARENTID, CHANGETYPE,
CONTEXTVAL, CREATEDON, ENTITYID, ENTITYTYPE, MODIFIEDON, OPERATION,
ORCHESTRATION, ORCHTARGET, PARENTPROCESSID, RETRY, SEQUENCE, STAGE,
STATUS) VALUES (?, ?, ?, ?, ?, ?, ?, ?, ?, ?, ?, ?, ?, ?, ?, ?)
bind => [16 parameters bound]
This is because following column might not be available in
PROD_OIM. ORCHPROCESS table. The post steps for above patch create this
column.
CONTEXTVAL CLOB
Apply Post steps for patch 13399365 to fix this issue as follows.
[fusion@fmwhost patch]$ cd /mnt/hgfs/setup/installers/idm/patch/13399365
[fusion@fmwhost 13399365]$ mv /app/fusion/fmw/iam/server/bin/weblogic.profile /app/fusion/fmw/iam/server/bin/weblogic.profile_bak
[fusion@fmwhost 13399365]$ cp -p sample_weblogic.profile.fa /app/fusion/fmw/iam/server/bin/weblogic.profile
[fusion@fmwhost bin]$ cd /app/fusion/fmw/iam/server/bin/
[fusion@fmwhost bin]$ more weblogic.profile
# For passwords if you dont want to put password </optional> in
this file just comment it out from here, you will be promted for it in
rumtime.
#Neccessary env variables [Mandatory]
ant_home=/app/fusion/fmw/modules/org.apache.ant_1.7.1
java_home=/app/fusion/jdk6
mw_home=/app/fusion/fmw
oim_oracle_home=/app/fusion/fmw/iam
#DB configuration variables [Mandatory]
operationsDB.user=FA_OIM
# Database password is optional. if you want to give it on terminal itself leave it commented. Otherwise uncomment it.
OIM.DBPassword=Oracle123
operationsDB.driver=oracle.jdbc.OracleDriver
operationsDB.host=fdbhost.paramlabs.com
operationsDB.serviceName=fusiondb
operationsDB.port=1521
appserver.type=wls
isMTEnabled=false
# If you have milty-tenancy enabled in your environment
mdsDB.user=FA_MDS
#Password is optional, if you want to give it on terminal itself leave it commented. Otherwise uncomment it.
mdsDB.password=Oracle123
mdsDB.host=fdbhost.paramlabs.com
mdsDB.port=1521
mdsDB.serviceName=fusiondb
#For domain level configurations [Mandatory]
# put here your admin server related credentials
weblogic_user=weblogic
#Password is optional, if you want to give it on terminal itself leave it commented. Otherwise uncomment it.
weblogic_password=Oracle123
weblogic_host=fmwhost
weblogic_port=7001
weblogic.server.dir=/app/fusion/fmw/wlserver_10.3
#oim specific domain level parameters [Mandatory]
oimserver_host=fmwhost.paramlabs.com
oimserver_port=14000
oim_managed_server=WLS_OIM1
oim_domain_dir=/app/fusion/config/domains/IDMDomain
isSODEnabled=false
#SOA specific details [Mandatory]
soa_home=/app/fusion/fmw/SOA
soa_managed_server=WLS_SOA1
soaserver_host=fmwhost.paramlabs.com
soaserver_port=8001
#put here the name of the targets of taskdetails. in non cluster it
will be soa server name and in cluster it will be something like
cluster_soa
taskdetails_target_name=WLS_SOA1
isOHSEnabled=true
#Following params is needed only if you have enabled OHS in your env
ohs_home=/app/fusion/fmw/web
#If your env is FA, you can set this var false or ignore this if your env is non FA.
isFAEnabled=true
Now let’s apply the weblogic patch script.
[fusion@fmwhost bin]$ export MW_HOME=/app/fusion/fmw
[fusion@fmwhost bin]$ export JAVA_HOME=/app/fusion/jdk6
[fusion@fmwhost bin]$ export ANT_HOME=/app/fusion/fmw/modules/org.apache.ant_1.7.1
[fusion@fmwhost bin]$ export OIM_ORACLE_HOME=/app/fusion/fmw/iam
[fusion@fmwhost bin]$ export PATH=$JAVA_HOME/bin:$PATH
[fusion@fmwhost bin]$ ./patch_weblogic.sh
It takes long time so be patient till it completes.
Launch OIM again to make sure you can login successfully and enter security answers successfully.


Now Launch SOA using following URL
http://<hostname>:8001/soa-infra
Login with weblogic username and password when prompted.

Prepare OIM to reconcile from ID store
[fusion@fmwhost bin]$ cd /app/fusion/fmw/iam/server/ldap_config_util/
[fusion@fmwhost ldap_config_util]$ cp -pr ldapconfig.props ldapconfig.props_orig
[fusion@fmwhost ldap_config_util]$ vi ldapconfig.props
[fusion@fmwhost ldap_config_util]$ cat ldapconfig.props
# OIMServer Type, Valid values can be WLS, JBOSS, WAS
# e.g.: OIMServerType=WLS
OIMServerType=WLS
# OIMAdmin User Login
# e.g.: OIMAdminUser=xelsysadm
OIMAdminUser=xelsysadm
# Skip Validation of OVD Schema
# e.g.: SkipOVDValidation=true|false, Default false
SkipOVDValidation=true
# OIM Provider URL
# e.g.: OIMProviderURL=t3://localhost:8003
OIMProviderURL=t3://fmwhost.paramlabs.com:14000
# OID URL
# e.g.: OIDURL=ldap://localhost:389
OIDURL=ldap://fmwhost.paramlabs.com:3060
# Admin user name to connect to OID
# e.g.: OIDAdminUsername=cn=orcladmin
OIDAdminUsername=cn=oimLDAP,cn=systemids,dc=paramlabs,dc=com
# Search base
# e.g.: OIDSearchBase=dc=company,dc=com
OIDSearchBase=dc=paramlabs,dc=com
# Name of the user container
# e.g.: UserContainerName=cn=Users
UserContainerName=cn=Users
# Name of the role container
# e.g.: RoleContainerName=cn=Roles
RoleContainerName=cn=Groups
# Name of the reservation container
# e.g.: ReservationContainerName=cn=Reserve
ReservationContainerName=cn=Reserve
[fusion@fmwhost ldap_config_util]$ export JAVA_HOME=/app/fusion/jdk6
[fusion@fmwhost ldap_config_util]$ export WL_HOME=/app/fusion/fmw/wlserver_10.3
Run following command
[fusion@fmwhost ldap_config_util]$ ./LDAPConfigPostSetup.sh /app/fusion/fmw/iam/server/ldap_config_util
[Enter OIM admin password:]
Authenticated with OIM Admin…..
Obtained Scheduler Service…..
Successfully Enabled Changelog based Reconciliation schedule jobs.
Successfully Updated Changelog based Reconciliation schedule jobs with last change number : <number>
Login to Enterprise Manager to make sure every required component is up.

Configure HTTP for OIM and SOA
Append following entries in /app/fusion/config/instances/web1/config/OHS/web1/moduleconf/admin.conf
################################################
## Entries Required by Oracle Identity Manager
################################################
# oim admin console(idmshell based)
<Location /admin>
SetHandler weblogic-handler
#WLProxySSL ON
#WLProxySSLPassThrough ON
WLCookieName oimjsessionid
WebLogicCluster fmwhost.paramlabs.com:14000
WLLogFile “${ORACLE_INSTANCE}/diagnostics/logs/OHS/oim_component.log”
</Location>
# oim self and advanced admin webapp consoles(canonic webapp)
<Location /oim>
SetHandler weblogic-handler
#WLProxySSL ON
#WLProxySSLPassThrough ON
WLCookieName oimjsessionid
WebLogicCluster fmwhost.paramlabs.com:14000
WLLogFile “${ORACLE_INSTANCE}/diagnostics/logs/OHS/oim_component.log”
</Location>
# xlWebApp – Legacy 9.x webapp (struts based)
<Location /xlWebApp>
SetHandler weblogic-handler
#WLProxySSL ON
#WLProxySSLPassThrough ON
WLCookieName oimjsessionid
WebLogicCluster fmwhost.paramlabs.com:14000
WLLogFile “${ORACLE_INSTANCE}/diagnostics/logs/OHS/oim_component.log”
</Location>
# Nexaweb WebApp – used for workflow designer and DM
<Location /Nexaweb>
SetHandler weblogic-handler
#WLProxySSL ON
#WLProxySSLPassThrough ON
WLCookieName oimjsessionid
WebLogicCluster fmwhost.paramlabs.com:14000
WLLogFile “${ORACLE_INSTANCE}/diagnostics/logs/OHS/oim_component.log”
</Location>
# used for FA Callback service.
<Location /callbackResponseService>
SetHandler weblogic-handler
#WLProxySSL ON
#WLProxySSLPassThrough ON
WLCookieName oimjsessionid
WebLogicCluster fmwhost.paramlabs.com:14000
WLLogFile “${ORACLE_INSTANCE}/diagnostics/logs/OHS/oim_component.log”
</Location>
# spml xsd profile
<Location /spml-xsd>
SetHandler weblogic-handler
#WLProxySSL ON
#WLProxySSLPassThrough ON
WLCookieName oimjsessionid
WebLogicCluster fmwhost.paramlabs.com:14000
WLLogFile “${ORACLE_INSTANCE}/diagnostics/logs/OHS/oim_component.log”
</Location>
# role-sod profile
<Location /role-sod>
SetHandler weblogic-handler
WLCookieName oimjsessionid
WebLogicCluster fmwhost.paramlabs.com:14000
WLLogFile “${ORACLE_INSTANCE}/diagnostics/logs/OHS/oim_component.log”
</Location>
<Location /HTTPClnt>
SetHandler weblogic-handler
#WLProxySSL ON
#WLProxySSLPassThrough ON
WLCookieName oimjsessionid
WebLogicCluster fmwhost.paramlabs.com:14000
WLLogFile “${ORACLE_INSTANCE}/diagnostics/logs/OHS/oim_component.log”
</Location>
################################################
## Entries Required by Oracle Identity Manager and SOA
################################################
# SOA Infrastructure
<Location /soa-infra>
SetHandler weblogic-handler
WLCookieName oimjsessionid
WebLogicCluster fmwhost.paramlabs.com:8001
WLLogFile “${ORACLE_INSTANCE}/diagnostics/logs/OHS/oim_component.log”
</Location>
# UMS Email Support
<Location /ucs>
SetHandler weblogic-handler
WLCookieName oimjsessionid
WebLogicCluster fmwhost.paramlabs.com:8001
WLLogFile “${ORACLE_INSTANCE}/diagnostics/logs/OHS/oim_component.log”
</Location>
# SOA Callback webservice for SOD – Provide the SOA Managed Server Ports
<Location /sodcheck>
SetHandler weblogic-handler
WLCookieName oimjsessionid
WebLogicCluster fmwhost.paramlabs.com:8001
WLLogFile “${ORACLE_INSTANCE}/diagnostics/logs/OHS/oim_component.log”
</Location>
# Callback webservice for SOA. SOA calls this when a request is approved/rejected
# Provide the SOA Managed Server Port
<Location /workflowservice>
SetHandler weblogic-handler
WLCookieName oimjsessionid
WebLogicCluster fmwhost.paramlabs.com:14000
WLLogFile “${ORACLE_INSTANCE}/diagnostics/logs/OHS/oim_component.log”
</Location>
A copy of my admin.conf file can be found here. This is just sample admin.conf, you must make changes to host name and ports accordingly.
Restart Web Server.
[fusion@fmwhost ldap_config_util]$ /app/fusion/config/instances/web1/bin/opmnctl stopall
opmnctl stopall: stopping opmn and all managed processes…
[fusion@fmwhost ldap_config_util]$ /app/fusion/config/instances/web1/bin/opmnctl startall
opmnctl startall: starting opmn and all managed processes…
Change Host assertion in Weblogic

Click Save and Activate Changes.
Verify OIM and SOA using HTTP port
http://<hostname>:7777/oim
http://<hostname>:7777/soa-infra
Enabling Oracle Identity Manager to Connect to SOA Using the Administrative Users Provisioned in LDAP
Login to EM console
Select Farm_IDMDomain –> Identity and Access–> OIM –> oim(11.1.1.3.0).
Select MBean Browser from the menu or right click to select it.

Select Application defined Mbeans –> oracle.iam –> Server: wls_oim1 –> Application: oim –> XML Config -> Config –> XMLConfig.SOAConfig –>SOAConfig
Change the username attribute to weblogic_idm

select Weblogic Domain –> IDMDomain from the Navigator.
Select Security –> Credentials from the down menu

Expand the key oim.
Click SOAAdminPassword.
Click Edit.

Change the username to weblogic_idm and set the password to the accounts password.
Click OK.
Run the reconciliation process to enable the Oracle WebLogic Server administrator, weblogic_idm, to be visible in the OIM Console. Follow these steps:
a. Log in to Oracle Identity Manager at:
<hosname>:7777/oim as the user xelsysadm
b. If prompted, set up challenge questions. This happens on your first login to Oracle Identity Manager.
c. Click Advanced.
d. Click the System Management tab.
e. Click the arrow for the Search Scheduled Jobs to list all the schedulers.
f. Select LDAP User Create and Update Full Reconciliation.
g. Click Run Now to run the job.
h. Go to the Administration page and perform a search to verify that the user is visible in the Oracle Identity Manager console.


Now click on Administration

Click Advanced Search –> Roles

Search for the Administrators role. Click the Administrators Role.
Click Open.

Click the Members tab. Click Assign.

Type weblogic_idm in the Search box and Click ->.
Select weblogic_idm from the list of available users.
Click > to move to Selected Users.

Click Save.
1. Log in to the weblogic console using at:
http://<hostname>:7777/console
2. Click Lock and Edit.
3. Expand the Environment Node in the Domain Structure window.
4. Click Servers to open the Summary of Servers Page.
5. Click on a server to show the server properties page.
6. Click the Server Start tab.
7. Add the following values to the Arguments field:
-Djps.subject.cache.key=5
-Djps.subject.cache.ttl=600000.
8. Click Save.
9. Repeat for each of the managed servers.
10. Click Activate Changes.

Restart Admin server and all managed servers
Integrate Oracle Identity Manager (OIM) and Oracle Access Manager (OAM)
Update Existing LDAP Users with Required Object Classes
Create a property file user.props as follows
[fusion@fmwhost bin]$ export ORACLE_HOME=/app/fusion/fmw/iam
[fusion@fmwhost bin]$ export IDM_HOME=/app/fusion/fmw/idm
[fusion@fmwhost bin]$ export MW_HOME=/app/fusion/fmw
[fusion@fmwhost bin]$ export JAVA_HOME=/app/fusion/jdk6
[fusion@fmwhost bin]$ cd /app/fusion/fmw/iam/idmtools/bin/
[fusion@fmwhost bin]$ more user.props
IDSTORE_HOST: fmwhost.paramlabs.com
IDSTORE_PORT: 3060
IDSTORE_ADMIN_USER: cn=orcladmin
IDSTORE_DIRECTORYTYPE: OID
IDSTORE_USERSEARCHBASE: cn=Users,dc=paramlabs,dc=com
IDSTORE_GROUPSEARCHBASE: cn=Groups,dc=paramlabs,dc=com
PASSWORD_EXPIRY_PERIOD: 7300
IDSTORE_LOGINATTRIBUTE: uid
Run the following command
[fusion@fmwhost bin]$ ./idmConfigTool.sh -upgradeLDAPUsersForSSO input_file=user.props
Enter LDAP admin user password :
Finished parsing LDAP
LDAP Users Upgraded.
Integrate Oracle Access Manager 11g with Oracle Identity Manager 11g
Create a property file as follows.
[fusion@fmwhost bin]$ more oimitg.props
LOGINURI: /${app.context}/adfAuthentication
LOGOUTURI: /oamsso/logout.html
AUTOLOGINURI: None
ACCESS_SERVER_HOST: fmwhost.paramlabs.com
ACCESS_SERVER_PORT: 5575
ACCESS_GATE_ID: Webgate_IDM
COOKIE_DOMAIN: .paramlabs.com
COOKIE_EXPIRY_INTERVAL: 120
OAM_TRANSFER_MODE: open
WEBGATE_TYPE: ohsWebgate11g
SSO_ENABLED_FLAG: true
IDSTORE_PORT: 3060
IDSTORE_HOST: fmwhost.paramlabs.com
IDSTORE_DIRECTORYTYPE: OID
IDSTORE_ADMIN_USER: cn=oamLDAP,cn=Users,dc=paramlabs,dc=com
IDSTORE_USERSEARCHBASE: cn=Users,dc=paramlabs,dc=com
IDSTORE_GROUPSEARCHBASE: cn=Groups,dc=paramlabs,dc=com
MDS_DB_URL: jdbc:oracle:thin:@fdbhost.paramlabs.com:1521:fusiondb
MDS_DB_SCHEMA_USERNAME: fa_mds
WLSHOST: fmwhost.paramlabs.com
WLSPORT: 7001
WLSADMIN: weblogic
DOMAIN_NAME: IDMDomain
OIM_MANAGED_SERVER_NAME: WLS_OIM1
DOMAIN_LOCATION: /app/fusion/config/domains/IDMDomain
IDSTORE_LOGINATTRIBUTE: uid
Run the following command.
[fusion@fmwhost bin]$ ./idmConfigTool.sh -configOIM input_file=oimitg.props
Enter sso access gate password :
Enter mds db schema password :
Enter idstore admin password :
Enter admin server user password :
…
The tool has completed its operation. Details have been logged to automation.log
Check for errors in the log file.
[fusion@fmwhost bin]$ grep -i error automation.log
Assigning Groups and Roles
Assigning WLSAdmins Group to WebLogic Administration Groups
1. Log in to the WebLogic Administration Server Console.
2. In the left pane of the console, click Security Realms.
3. On the Summary of Security Realms page, click myrealm under the Realms table.
4. On the Settings page for myrealm, click the Roles & Policies tab.
5. On the Realm Roles page, expand the Global Roles entry under the Roles table. This brings up the entry for Roles. Click the Roles link to go to the Global Roles page.
6. On the Global Roles page, click the Admin role to go to the Edit Global Role page:
a. On the Edit Global Roles page, under the Role Conditions table, click the Add Conditions button.
b. On the Choose a Predicate page, select Group from the drop down list for predicates and click Next.
c. On the Edit Arguments Page, Specify IDM Administrators in the Group Argument field and click Add.
7. Click Finish to return to the Edit Global Rule page.
8. The Role Conditions table now shows the IDM Administrators Group as an entry.
9. Click Save to finish adding the Admin role to the IDM Administrators Group.
10. Validate that the
changes were successful by bringing up the WebLogic Administration
Server Console using a web browser. Log in using the credentials for the
weblogic_idm user.
Validate that the changes were
successful by bringing up the WebLogic Administration Server Console
using a web browser. Log in using the credentials for the weblogic_idm
user.
Perform Bug 13824816 Workaround
1. Since you are already on the Global Roles page, click the Admin role to go to the Edit Global Role page:
2. On the Edit Global Roles page, under the Role Conditions table, click Add Conditions.
3. On the Choose a Predicate page, select Group from the predicates list and click Next.
4. On the Edit Arguments Page, specify OAMAdministrators in the Group Argument field and click Add.
5. Click Finish to return to the Edit
Global Rule page. The Role Conditions table now shows the
OAMAdministrators Group as an entry.
6. Click Save to finish adding the Admin role to the OAMAdministrators Group.
Updating the boot.properties File
Update the boot.properties file for the
Administration Server and the managed servers with the WebLogic admin
user (weblogic_id) created in Oracle Internet Directory.
[fusion@fmwhost security]$ cd /app/fusion/config/domains/IDMDomain/servers/AdminServer/security
[fusion@fmwhost security]$ cp -pr boot.properties boot.properties_preOAM
[fusion@fmwhost security]$ more boot.properties
username=weblogic_idm
password=Param123
[fusion@fmwhost security]$ cp -pr boot.properties ../../WLS_OAM1/security/
[fusion@fmwhost security]$ cp -pr boot.properties ../../WLS_OIM1/security/
[fusion@fmwhost security]$ cp -pr boot.properties ../../WLS_SOA1/security/
[fusion@fmwhost security]$ cp -pr boot.properties ../../wls_ods1/security/
Restart all services manually to encrypt the file
[fusion@fmwhost bin]$ nohup ./startWebLogic.sh &
[fusion@fmwhost bin]$ nohup ./startManagedWebLogic.sh wls_ods1 &
[fusion@fmwhost bin]$ nohup ./startManagedWebLogic.sh WLS_OAM1 &
[fusion@fmwhost bin]$ nohup ./startManagedWebLogic.sh WLS_OIM1 &
[fusion@fmwhost bin]$ nohup ./startManagedWebLogic.sh WLS_SOA1 &
Install Webgate
Versions of GCC Third-Party Libraries for Linux and Solaris
|
Operating System
|
Architecture
|
GCC Libraries Required
|
Library Version
|
|
Linux 32-bit
|
x86
|
libgcc_s.so.1
libstdc++.so.5
|
3.3.2
|
|
Linux 64-bit
|
x64
|
libgcc_s.so.1
libstdc++.so.6
|
3.4.6
|
|
Solaris 64-bit
|
SPARC
|
libgcc_s.so.1
libstdc++.so.5
|
3.3.2
|
Verifying the GCC Libraries Version on Linux and Solaris Operating Systems
Make sure we have the required libraries for Webgate installation. If you have installed Oracle Linux then you should have them.
Perform the following checks to verify the version of GCC libraries:
On the Linux32 on i386 platform:
Run the following commands and ensure that their output is always greater than 0:
strings -a libgcc_s.so.1 | grep -c “GCC_3.0″
strings -a libgcc_s.so.1 | grep -v “GCC_3.3.1″ | grep -c “GCC_3.3″
file libgcc_s.so.1 | grep “32-bit” | grep -c “80386″
file libstdc++.so.5 | grep “32-bit” | grep -c “80386″
On the Linux 64 on x86-64 platform:
Run the following commands and ensure that their output is always greater than 0:
strings -a libgcc_s.so.1 | grep -c “GCC_3.0″
strings -a libgcc_s.so.1 | grep -v “GCC_3.3.1″ | grep -c “GCC_3.3″
strings -a libgcc_s.so.1 | grep -c “GCC_4.2.0″
file libgcc_s.so.1 | grep “64-bit” | grep -c “x86-64″
file -L libstdc++.so.6 | grep “64-bit” | grep -c “x86-64″
On the Solaris 64 on SPARC platform:
Run the following commands and ensure that their output is always greater than 0:
strings -a libgcc_s.so.1 | grep -c “GCC_3.0″
strings -a libgcc_s.so.1 | grep -v “GCC_3.3.1″ | grep -c “GCC_3.3″
file libgcc_s.so.1 | grep “64-bit” | grep -c “SPARC”
file libstdc++.so.5 | grep “64-bit” | grep -c “SPARC”
Since we have Oracle Linux x86-64 platform, let us verify the same.
[fusion@fmwhost Disk1]$ strings -a /lib64/libgcc_s.so.1 | grep -v “GCC_3.3.1″ | grep -c “GCC_3.3″
1
[fusion@fmwhost Disk1]$ strings -a /lib64/libgcc_s.so.1 | grep -c “GCC_3.0″
1
[fusion@fmwhost Disk1]$ strings -a /lib64/libgcc_s.so.1 | grep -v “GCC_3.3.1″ | grep -c “GCC_3.3″
1
[fusion@fmwhost Disk1]$ strings -a /lib64/libgcc_s.so.1 | grep -c “GCC_4.2.0″
1
[fusion@fmwhost Disk1]$ file -L /lib64/libgcc_s.so.1 | grep “64-bit” | grep -c “x86-64″
1
[fusion@fmwhost Disk1]$ file -L /usr/lib64/libstdc++.so.6 | grep “64-bit” | grep -c “x86-64″
1
This all looks good so we don’t need to download any additional files.
Start webgate installation
We need to have the required libraries in a dedicated directory before we install webgate.
[fusion@fmwhost Disk1]$ mkdir /app/fusion/oam_lib
[fusion@fmwhost Disk1]$ cp -p /lib64/libgcc_s.so.1 /app/fusion/oam_lib/
[fusion@fmwhost Disk1]$ cp -p /usr/lib64/libstdc++.so.6 /app/fusion/oam_lib/
[fusion@fmwhost Disk1]$ ls -ltr /app/fusion/oam_lib/
total 1024
-rwxr-xr-x 1 fusion dba 976312 Sep 26 05:09 libstdc++.so.6.0.8
-rwxr-xr-x 1 fusion dba 58400 Sep 26 05:09 libgcc_s-4.1.2-20080825.so.1
lrwxrwxrwx 1 fusion dba 28 Mar 7 00:03 libgcc_s.so.1 -> libgcc_s-4.1.2-20080825.so.1
lrwxrwxrwx 1 fusion dba 18 Mar 7 00:03 libstdc++.so.6 -> libstdc++.so.6.0.8
Start webgate installation from <Repository_location>/webgate/Disk1
[fusion@fmwhost ~]$ cd /mnt/hgfs/setup/installers/webgate/Disk1/
[fusion@fmwhost Disk1]$ ./runInstaller
…
Please specify JRE/JDK location ( Ex. /home/jre ), <location>/bin/java should exist :/app/fusion/jdk6
Click Next
Once prerequisites check completes, click Next
Middleware Home: /app/fusion/fmw
Home Directory: webgate
Click Next
GCC Library Location: /app/fusion/oam_lib and click Next
Review the summary and click Install
Once installation completes, click Next
Review the summary and click Finish
Deploy WebGate to Oracle HTTP
Make a backup of httpd.conf for safety.
[fusion@fmwhost ~]$ cp -pr
/app/fusion/config/instances/web1/config/OHS/web1/httpd.conf
/app/fusion/config/instances/web1/config/OHS/web1/httpd.conf_preWebgate
1. Execute the command deployWebGate which is located in:
WEBGATE_ORACLE_HOME/webgate/ohs/tools/deployWebGate
The command takes the following arguments:
Oracle HTTP Instance configuration Directory
WebGate Home Directory
[fusion@fmwhost deployWebGate]$ ./deployWebGateInstance.sh -w /app/fusion/config/instances/web1/config/OHS/web1 -oh /app/fusion/fmw/webgate
Copying files from WebGate Oracle Home to WebGate Instancedir
2. Set the library path to include the WEB_ORACLE_HOME/lib directory
[fusion@fmwhost deployWebGate]$ export LD_LIBRARY_PATH=$LD_LIBRARY_PATH:/app/fusion/fmw/web/lib
Change directory to: WEBGATE_ORACLE_HOME/webgate/ohs/tools/setup/InstallTools
[fusion@fmwhost deployWebGate]$ cd /app/fusion/fmw/webgate/webgate/ohs/tools/setup/InstallTools/
3. Run the
following command to copy the file apache_webgate.template from the
WebGate home directory to the WebGate instance location (renamed to
webgate.conf) and update the httpd.conf file to add one line to include
the name of webgate.conf
[fusion@fmwhost InstallTools]$ ./EditHttpConf -w /app/fusion/config/instances/web1/config/OHS/web1 -oh /app/fusion/fmw/webgate
The web server configuration file was successfully updated
/app/fusion/config/instances/web1/config/OHS/web1/httpd.conf has been
backed up as
/app/fusion/config/instances/web1/config/OHS/web1/httpd.conf.ORIG
Note: If you get error
like “Error: You are not authorized to configure this web server” then
you need to check the Group value in
/app/fusion/admin/ohs_inst1/config/OHS/ohs1/httpd.conf
It should be dba or oinstall based on the default group of the fusion user.
[fusion@fmwhost web1]$ ls -ltr /app/fusion/config/instances/web1/config/OHS/web1/webgate/config/
total 20
drwxr-xr-x 2 fusion dba 4096 Mar 7 00:08 simple
-rwxr-x— 1 fusion dba 14337 Mar 7 00:08 oblog_config_wg.xml
[fusion@fmwhost web1]$ ls -ltr /app/fusion/config/domains/IDMDomain/output/Webgate_IDM_11g/
total 8
-rw-r—– 1 fusion dba 2967 Mar 6 01:23 ObAccessClient.xml
-rw——- 1 fusion dba 3141 Mar 6 01:23 cwallet.sso
4. Copy the
files ObAccessClient.xml, cwallet.sso, and password.xml, which were
generated when you created the agent from the directory ASERVER_HOME/output/Agent Name on IDMHOST1, to the directory ORACLE_INSTANCE/config/OHS/component/webgate/config
[fusion@fmwhost web1]$ cp -pr
/app/fusion/config/domains/IDMDomain/output/Webgate_IDM_11g/*
/app/fusion/config/instances/web1/config/OHS/web1/webgate/config/
[fusion@fmwhost web1]$ ls -ltr /app/fusion/config/instances/web1/config/OHS/web1/webgate/config/
total 32
-rw——- 1 fusion dba 3141 Mar 6 01:23 cwallet.sso
drwxr-xr-x 2 fusion dba 4096 Mar 7 00:08 simple
-rwxr-x— 1 fusion dba 14337 Mar 7 00:08 oblog_config_wg.xml
-rw-r—– 1 fusion dba 0 Mar 7 01:07 ObAccessClient.xml.lck
-rw-r—– 1 fusion dba 0 Mar 7 01:07 polltracking.lck
-rw-r—– 1 fusion dba 4774 Mar 7 01:07 ObAccessClient.xml
Restart web service
[fusion@fmwhost web1]$ /app/fusion/config/instances/web1/bin/opmnctl stopall
opmnctl stopall: stopping opmn and all managed processes…
[fusion@fmwhost web1]$ /app/fusion/config/instances/web1/bin/opmnctl startall
opmnctl startall: starting opmn and all managed processes…
Now launch http:<hostname>:7777/console and this should redirect to OAM login page.
Once logged in, it should redirect back to Weblogic Console home page.
Now SSO Logout function will also work.
Patch Webgate
We had skipped webgate patch in earlier steps of patching since webgate was not yet installed. Let us apply the patch now.
Go to <repository location>/installers/webate/patch
[fusion@fmwhost patch]$ export ORACLE_HOME=/app/fusion/fmw/webgate
[fusion@fmwhost patch]$ $ORACLE_HOME/OPatch/opatch napply
[fusion@fmwhost patch]$ export JAVA_HOME=/app/fusion/jdk6
[fusion@fmwhost patch]$ export WL_HOME=/app/fusion/fmw/wlserver_10.3
[fusion@fmwhost patch]$ $ORACLE_HOME/OPatch/opatch napply
Do you want to proceed? [y|n]
y
…
Please shutdown Oracle instances running out of this ORACLE_HOME on the local system.
(Oracle Home = ‘/app/fusion/fmw/webgate’)
Is the local system ready for patching? [y|n]
y
…
Patching component oracle.as.oam.webgate.ohs, 11.1.1.5.0…
Copying file to “/app/fusion/fmw/webgate/webgate/ohs/tools/t2p/oam-webgate-t2p.jar”
Copying file to “/app/fusion/fmw/webgate/webgate/ohs/config/np1111_wg.txt”
Copying file to “/app/fusion/fmw/webgate/webgate/ohs/lib/webgate.so”
Copying file to “/app/fusion/fmw/webgate/webgate/ohs/lib/libxmlengine.so”
Copying file to “/app/fusion/fmw/webgate/webgate/ohs/tools/setup/InstallTools/EditHttpConf”
Copying file to “/app/fusion/fmw/webgate/webgate/ohs/tools/deployWebGate/deployWebGateInstance.sh”
…
The local system has been patched and can be restarted.
UtilSession: N-Apply done.
OPatch succeeded.
Restart all services and reconfirm that everything comes up successfully. The EM should look as follows.
Create new Response File
This step has to be done on node 2 (Fusion Applications Node). Make
sure you are having /etc/hosts or DNS entry for node 1 in node 2 and
vice versa and you can reach both servers from each other.
Since Provisioning Wizard comes as part of Provisioning framework, you must Install Fusion Applications Provisioning Framework on node 2 as well. Follow this link for steps of the same.
Install Fusion Applications Provisioning Framework
Once this is done, in order to create a new fusion applications
Response File we should launch the provisioning wizard again from <framework_location>/bin
<framework_location> is same what we mentioned in previous post. i.e. /app/fusion/provisioning
Note: The step which was earlier called “Provisioning Plan” is now called “Response File” since last couple of releases.
Unzip the JDK from stage directory.
[fusion@fahost ~]$ cd /app/fusion/
[fusion@fahost ~]$ unzip /mnt/hgfs/setup/installers/jdk/jdk6.zip
[fusion@fahost ~]$ export JAVA_HOME=/app/fusion/jdk6
[fusion@fahost ~]$ cd /app/fusion/provisioning/bin
[fusion@fahost bin]$ ./provisioningWizard.sh &

Click Next

Select “Create a New Applications Environment Provisioning Response File” and click Next

Deselect the checkbox and click Next

Click Yes

We are installing Oracle Fusion Accounting Hub here. You can select
the product which you want to configure. Please note that just like
eBusiness Suite, here also it will configure other modules regardless
which module you have selected due to the dependencies between modules.
You can see how many Admin and managed servers will be created for this configuration in the below panel.
Click on details to see how many Domains, Admin and managed servers will be created with this selected configuration.


Enter desired values here and click Next

Enter following values.
User Name: weblogic
Installers Directory Location: <Repository_location> (for our case /stage or /mnt/hgfs/stage)
Applications Base: /app/fusion
Applications Configuration: /app/fusion/instance
RDP Password: <Enter the same password as earlier here>
Note: You would see a change in this screen. We
don’t specify the idmDomainConfig.param file here in this screen as we
used to do till 11.1.4 release. There is a dedicated screen for this
later.

The default Base port is 7000
and since now we have 2 nodes installation, there will not be any
conflict with IDM node which also has few overlapping ports. Remaining
are automatically selected based on what value you give as base port.

Enter the database details here and click Next

Enter same password for all accounts and click Next

Enter password here and click Next. Must have one uppercase and number in the password. Click Next

Since we are doing single node installation, enter our host name here. Click Next

We are not publishing any URLs outside so don’t select DMZ. Enter values as follows.
DMZ : Unchecked
Host: <hostname>
Virtual Host mode: Port based
Domain name: Full domain name
HTTP Port and HTTPS ports: Don’t change
Click Next

Review the information and click Next

Click Next

Click Next

This is new screen since 11.1.5. Here you can browse for the idmDomainConfig.param file as generated in previous steps.
Make sure that you have copied the idmDomainConfig.param file from node 1 (IDM node) from $IAM_HOME/idmtools/bin/ idmDomainConfig.param to any location on this node 2. You can FTP this file in ascii mode since it contains text values.
[root@fahost ~]# ls -ltr /app/fusion/idmDomainConfig.param
-rw-r—– 1 fusion dba 1231 Apr 6 04:43 /app/fusion/idmDomainConfig.param

Most of the values will be populated from the idmDomainConfig.param file.
Enter remaining values as follows.
Super User name: weblogic_fa
Check all following 3 check boxes.
Enter all passwords.

OIM Administrator User name: weblogic_idm
OIM Managed Server Port: 14000
HTTP endpoint URL: http://<hostname>:7777
Click Next

Again here most values will be populated.
OAM Administrator User Name: oamadmin
AAA Server Port: 5575
Access Server Identifier: WLS_OAM1
Due to a known bug, Set to Simple, enter password and again change to Open. Click Next

OPSS Policy store JPS Root Node: cn=FAPolicies
Make sure to select “Create OPSS Policy Store JPS Root Node”
Click Next

Enter database details and for schema owner, enter the same value as created during RCU. In our case prefix was FA so value is FA_MDS. Enter password and click Next


Review the summary and click Finish to create the response file and provisioning summary files.
Keep a backup of the Response file if you want.
[fusion@fahost bin]$ cp -pr provisioning.rsp provisioning.rsp.bak
[fusion@fahost bin]$ cp -pr provisioning.summary provisioning.summary.bak
Provision an Applications Environment
Note: If you are using VMWare, it is advisable to
keep the staging directory path to be short to avoid any file path going
more than 255 characters.
[root@fahost ~]# umount /mnt/hgfs
[root@fahost ~]# mkdir /stage
[root@fahost ~]# mount -t vmhgfs .host:/stage /stage
Since we have copied required Webgate libraries on node 1, we must copy them on node 2 as well.
[fusion@fahost bin]$ mkdir /app/fusion/oam_lib/
[fusion@fahost bin]$ cd /app/fusion/oam_lib/
[fusion@fahost oam_lib]$ scp fusion@fmwhost:/app/fusion/oam_lib/* .
[fusion@fahost oam_lib]$ ls -ltr
total 1024
-rwxr-xr-x 1 fusion dba 58400 Apr 6 15:01 libgcc_s.so.1
-rwxr-xr-x 1 fusion dba 976312 Apr 6 15:01 libstdc++.so.6
[fusion@fahost oam_lib]$ cp -pr /app/fusion/oam_lib/* /stage/installers/webgate/
Following file is also required for provisioning phase in addition to above.
[fusion@fahost oam_lib]$ cp -p /usr/lib64/libstdc++.so.5 /app/fusion/oam_lib/
[fusion@fahost oam_lib]$ cp -p /usr/lib64/libstdc++.so.5 / stage/installers/webgate/
Make sure that the IDM infrastructure is started on Node 1. (only if not already started)
1. Source profile
more ~/.bash_profile
ORACLE_HOME=/app/fusion/database/product/11.2.0/dbhome_1
export ORACLE_HOME
ORACLE_SID=fusiondb
export ORACLE_SID
JAVA_HOME=/app/fusion/jdk6
export JAVA_HOME
PATH=$PATH:$ORACLE_HOME/bin
export PATH
2. Start Listener
lsnrctl start LISTENER_FUSIONDB
3. Start Database
sqlplus / as sysdba
SQL> startup
4. Start OID
/app/fusion/admin/oid1/bin/opmnctl startall
5. Start Web
/app/fusion/admin/web1/bin/opmnctl startall
6. Start Weblogic Admin Server for IDMDomain
cd /app/fusion/admin/IDMDomain/aserver/IDMDomain/bin/
nohup ./startWebLogic.sh &
(Wait till you see RUNNING in nohup.out log file)
7. Start Node Manager
cd /app/fusion/fmw/wlserver_10.3/server/bin/
nohup ./startNodeManager.sh &
(Wait till you see “started on port 5556″ in nohup.out log file)
8. Start OAM managed server for IDMDomain (since we cannot login to console without OAM)
cd /app/fusion/admin/IDMDomain/aserver/IDMDomain/bin/
nohup ./startManagedWebLogic.sh wls_oam1 &
(Wait till you see RUNNING in nohup.out log file)
9. Start remaining managed servers
Either from command prompt
cd /app/fusion/admin/IDMDomain/aserver/IDMDomain/bin/
nohup ./startManagedWebLogic.sh wls_ods1 &
nohup ./startManagedWebLogic.sh wls_oim1 &
nohup ./startManagedWebLogic.sh wls_soa1 &
(Wait till you see RUNNING in nohup.out log file for each of them.
You can start them in in parallel, just make sure all start fine)
Or by logging into Weblogic Console->Servers->Control screen.
10. ONLY In case if restarting from postconfigure phase, do the following on Node 2 (FA node)
For 11.1.4 and earlier versions
cd /app/fusion/fusionapps/wlserver_10.3/common/nodemanager/ad002aph01
nohup ./startNodeManagerWrapper.sh &
For 11.1.5 onwards releases
cd /app/fusion/instance/nodemanager/ad002aph01
nohup ./startNodeManagerWrapper.sh &
-bash-3.2$ /app/fusion/instance/CommonDomain_webtier/bin/opmnctl startall
Start Fusion Applications Provisioning
Launch the installer from <provisioning_repository>/bin
It is important to start it with “-ignoreSysPrereqs true” switch as mentioned in the release notes.
[fusion@fahost bin]$ ./provisioningWizard.sh -ignoreSysPrereqs true &

Click Next

Select “Provision an Applications Environment” and browse for the response file created in last step. Click Next


Review and click Next

Validate the information and click Next

In case if you want to revisit some of the section in the Response File then you can do so here. Click Next

Review the summary and click Next to begin. Good luck J

You can ignore following error since we are not using OVD. Also since
we have used “ignoreSysPrereqs true” you will see Next button. Click Next to continue.

Once the Installation phase finishes, click Next
Note: If you are using longer path for stage
directory on Linux then install phase may fail with errors. This is due
to more than 255 characters path for certain patch files. Check
following link for solution for the same.
http://www.oratraining.com/blog/2013/04/solution-for-atgpf-build-failure-during-install-phase-with-oui-67073utilsession-failed-null-error/

Once Preconfigure phase completes, click Next
Important Notes:
You may see a lag between 100% completion of the phase and “Next”
button being enabled. This is the time where the status changes from
COMPLETED to ENDED. Here it takes backup of the instance directory at
/app/fusion/provisioning/restart so that it can cleanup and restore from
next step if it fails.
The installation logs are being created at/app/fusion/logs/provisioning/plan<timestamp>/<hostname> directory. This is the most useful place to troubleshoot.
The status flags like STARTED, COMPLETED, FAILED, ENDED are stored in/app/fusion/provisioning/phaseguards directory.
Please be careful while removing, renaming or creating flag files here
since it will change the current status of the provisioning.
And for status of each domain within the particular phase, the flag files are written at/app/fusion/provisioning/phaseguards/pf directory
Good thing in new Fusion applications setup is that when you retry it
only performs the actions for failed products but those actions of
completed products are not repeated. This saves a lot of time compared
to our last installation of 11.1.1.5


Once configure completes, click Next
Note: If configure fails with following error then do this workaround.
“Caused by: java.lang.RuntimeException: IO Error: Connection reset”
Workaround:
SQLNET.INBOUND_CONNECT_TIMEOUT = 0 in at $ORACLE_HOME/network/admin/sqlnet.ora on node 1 (or DB node)
LSNRCTL> set inbound_connect_timeout =0 on DB node
INBOUND_CONNECT_TIMEOUT_LISTENER_FUSIONDB = 0 in $ORACLE_HOME/network/admin/listener.ora on DB node
You can remove this once provisioning is complete.
Note: The name of next phase has changed to
“Configure Primary/Secondary” instead of “Configure Secondary” as in
11.1.1.5 release since it was misleading.

Click Next once Configure Primary/Secondary phase completes.

Post configure is the most important and most error-prone part of
Fusion Applications provisioning. Most of the people don’t get such a
clean screen like above in first attempt (neither did I earlier). Don’t
worry pr panic if you get errors, rest assured that if you have followed
all earlier steps correctly, they are mostly random errors due to out
of memory, network etc. make sure that you have sufficient free memory
on node while running this. Also make sure that all components in IDM
node (odi is optional at this phase) are up and running.
Validate that you are able to login to all IDM components before running this phase. Login to EM console to see the status: http://<fmwhost>:7777/em
Even if postconfigure has completed on some products and failed on
others, when you click on retry, it will restore the failed products
only and skip the phase for completed products.
You will see following screen when you click on Retry if any phase
has errored out. Once you press OK it will restart the same phase only
for failed product families.


Be patient when startup brings up all required managed servers.
please note that if some components fail to startup and if you retry, it
will do startup phase for all domains again including those have
completed successfully. Make sure sufficient memory is available during
this point.
Click Next once completed.

Validation phase has known bug and you will see following error for each domain validation.

During the Validate phase, you will
encounter WebGate validation errors and the error messages in the
provisioning log are as follows:
Webgate: private-validate
validateWegPageStatus – BUILD_ERROR: The HTTP request to
http://<host>:<port>/oberr.cgi?progid=1 returned status: 404
[runProvisioning-validate] [NOTIFICATION]
[] [runProvisioning-validate] [tid: 11] [ecid:
0000JgMcCTD9lZOLIih8if1GeQ7k000002,0] [logStatus]
STATE=BUILD_ERROR!TIMESTAMP=<>
PST!TARGET=private-validate!CATEGORY=BUILD_ERROR!DOMAIN=CommonDomain!HOSTNAME=<host>!PRODUCTFAMILY=fs!PRODUCT=WebGate!TASK=validate
WebPageStatus!TASKID=fs.WebGate.BUILD_ERROR.private-validate.validate
WebPageStatus!MESSAGE=The HTTP request to http://<host>:<port>/oberr.cgi?progid=1 returned status: 404.!DETAIL=The
HTTP request to http://<host>:<port>/oberr.cgi?progid=1
returned status:
404.!BUILDFILE=<framework_location>/provisioning/provisioning-build/webgate-build.xml!LINENUMBER=992!
These WebGate web page validation errors
can be ignored. If there are any other validation errors you must
resolve them before proceeding to the Summary phase. After resolving all
validation errors, if the Next button on the Provisioning Wizard is not enabled, perform these steps from the command line to enable it:
-
cd <APPLICATIONS_CONFIG>/phaseguards (for example /app/fusion/provisioning/phaseguards)
-
rm validate-<host>-FAILED.grd.
-
touch validate-<host>-COMPLETED.grd.
-
touch validate-<host>-ENDED.grd (this last part is not mentioned in Oracle documents but this is required)
-
The Next button should be enabled on the Provisioning Wizard.
WARNING:
Deleting and creating files in the phase
guard directory should be used as a workaround to resolve validation
phase issues ONLY if none of the other options work. In any other case,
you should never modify or make changes to the phase guard files.
[fusion@fahost]$
cd /app/fusion/provisioning/phaseguards
[fusion@fahost phaseguards]$
rm validate-fahost-FAILED.grd
[fusion@fahost phaseguards]$
touch validate-fahost-COMPLETED.grd
[fusion@fahost phaseguards]$
touch validate-fahost-ENDED.grd

Now you can see the Next button enabled. Click
Next to go to post-installation summary.

 Summary
:
ComonDomain
Admin Console:
http://fahost:10633/console
EM Welcome page:
http://fahost:10633/em
Homepage – Application URL:
https://fahost:10634/homePage
CRM Domain
Admin Console:
http://fahost:10635/console
EM:
http://fahost:10635/em
Financial Domain
Admin Console:
http://fahost:10623/console
EM:
http://fahost:10623/em
HCM Domain
Admin Console:
http://fahost:10639/console
EM:
http://fahost:10639/em
BI Domain
Admin Console:
http://fahost:10641/console
OIM
HTTP URL:
http://fmwhost.paramlabs.com:7777
HTTPS URL:
https://fmwhost.paramlabs.com:7777
Login to homepage URL with weblogic_fa user.


You can see that “Fusion Accounting Hub” is showing up as
“Provisioned” but implementation is “Not Started” yet. This is the next
step after installing Fusion Applications and not part of this guide.


*******************************END***************************************